
The USD Coin which is popularly known simply as USDC is one of the leading stablecoins in the crypto space. USDC is pegged to the U.S. dollar on a 1:1 basis and every unit of the USDC token in circulation is backed by a real dollar bill that is held in reserve.
Metamask on the other hand is the leading name when it comes to non-custodial wallets in the crypto space. It is used by millions of crypto investors to store, stake, send and receive various cryptocurrencies and other crypto assets across multiple compatible blockchains.
If you’re a Metamask user who is currently searching for methods to add the USD Coin (USDC) to your wallet, then you’re on the right page.
In the article, you will learn how to add USDC to Metamask easily across different blockchains where the token is deployed on.
How To Add USDC To Metamask (Quick Guide)
- Launch the Metamask extension or mobile app and unlock your account.
- Scroll down to the bottom of the page and click on [Import tokens].
- Search for USDC and select the correct token.
- Click on [Next].
- Finally, click on [Import token] to add USDC to your wallet.
How To Add USDC To Your Metamask Wallet (Step By Step Guide)
The USD Coin (USDC) is a token deployed on various blockchains with Ethereum being the most popular one with the highest number of transactions.
To add USDC to your Metamask wallet, you need to ensure that the “Ethereum Mainnet” is the selected network.
By default, the Ethereum Mainnet should be the selected network, but if you have switched networks in the past, you will have to switch back to Ethereum to follow along with this guide.
Once your wallet is connected to the Ethereum Mainnet, you can now import the USDC token to your wallet.
Below is how you can add USDC to your Metamask wallet on the Ethereum (ERC-20) network.
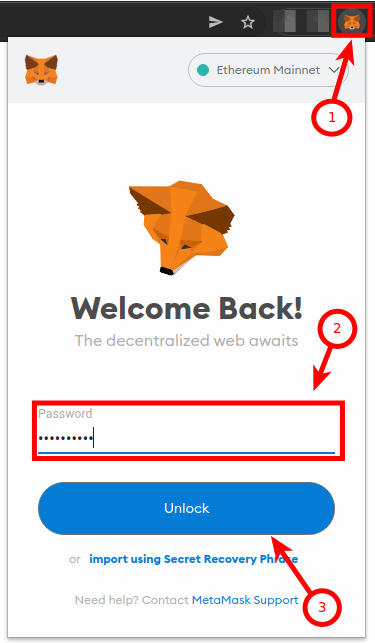
Step 1: Launch the Metamask extension and enter your password.
Launch the Metamask extension on your web browser by clicking on the Metamask icon, then enter the account password to unlock your wallet.
Step 2: Ensure Ethereum is the selected network.
Since we’re adding the USD Coin (USDC) to Metamask via the Ethereum Network (ERC-20), you want to make sure that the Ethereum Mainnet is the selected network on your wallet.
By default, the Ethereum mainnet should be the selected network on your wallet, but if you have switched networks in the past on your wallet, click on the network dropdown box and select “Ethereum Mainnet” from the list of available networks.

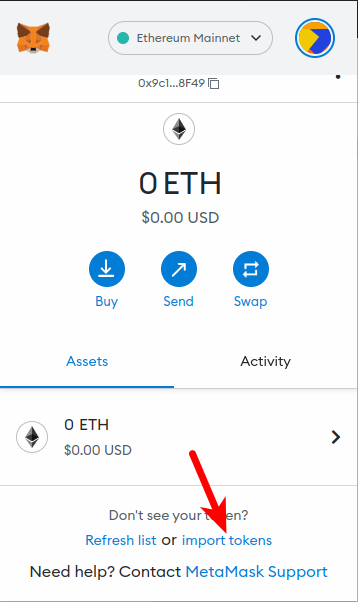
Step 3: Click on [Import tokens].
Now that you have selected the correct network, scroll down to the bottom of the Metamask window and click on [Import tokens].
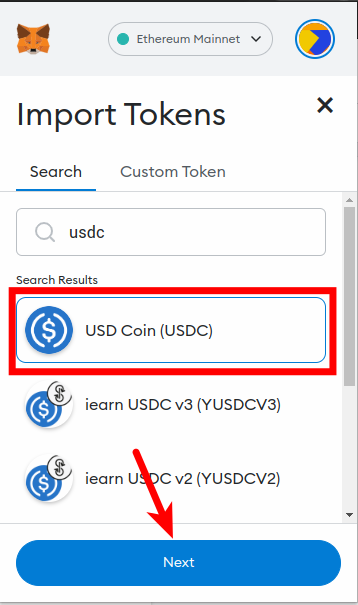
Step 4: Search for the “USDC” and select it from the list, then click [Next].
On the token import page, search for the USDC token by typing in “USDC” in the search field and then selecting the correct USDC token from the results. The correct USDC token is usually the first one on the list.
After that, click on [Next].
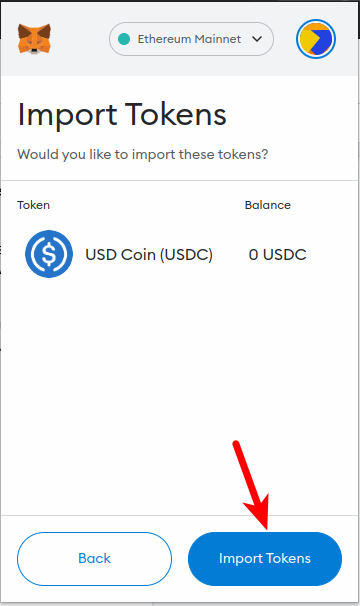
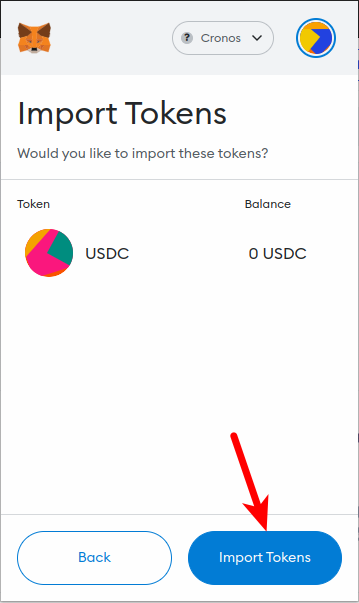
Step 5: Click on [Import tokens] to add USDC to your wallet.
Finally, click on [Import tokens] to add the USD Coin (USDC) to your wallet on the Metamask browser extension.
Once the token has been added, go back to the Metamask home window and you should be able to view your USDC balance now.
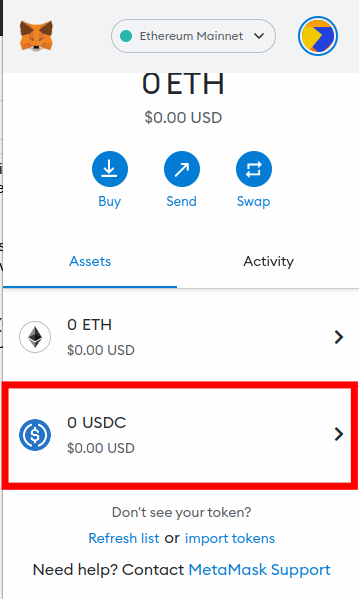
With this, you have successfully added the USDC token to your Metamask wallet on the Ethereum network (ERC-20).
How To Add USDC To Metamask On Other Networks.
Aside from Ethereum, the USD Coin (USDC) is also available on a bunch of other networks which may offer cheaper gas fees and faster transaction speeds when compared to the Ethereum Mainnet.
Although not all of these networks are compatible with Metamask, some of them are, and below is how you can add USDC to Metamask using other EVM-compatible networks including Polygon, BSC, Cronos, and Avalanche.
How To Add USDC To Metamask On The Polygon Network
Below is how you can add USDC To Metamask on the Polygon Network.
1. Copy the USDC contract address for the Polygon network.
To add the USD Coin to your Metamask wallet on Polygon, you first need to get the contract address for the USDC token on the Polygon blockchain.
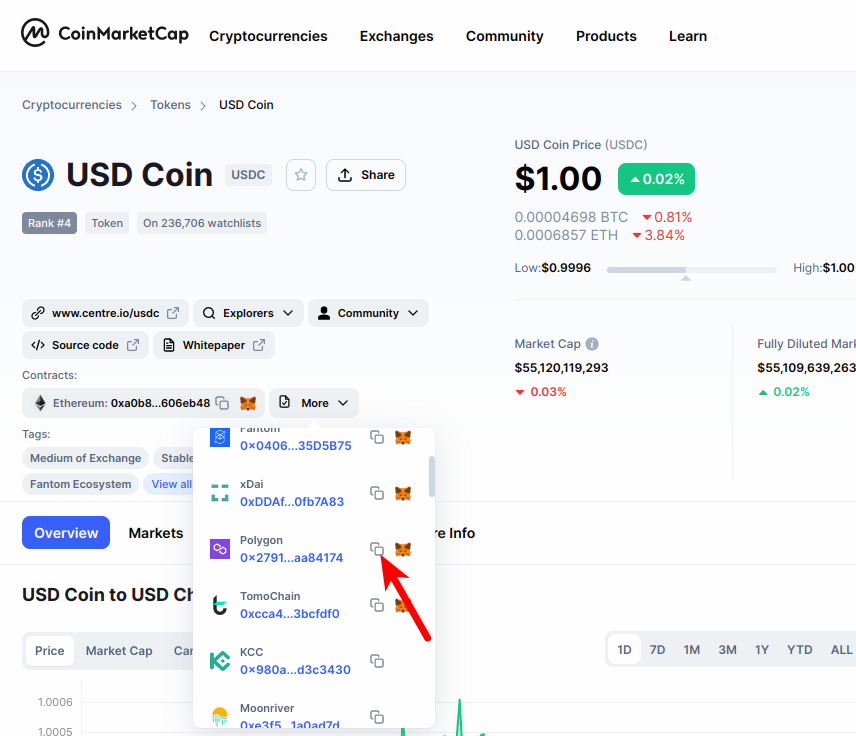
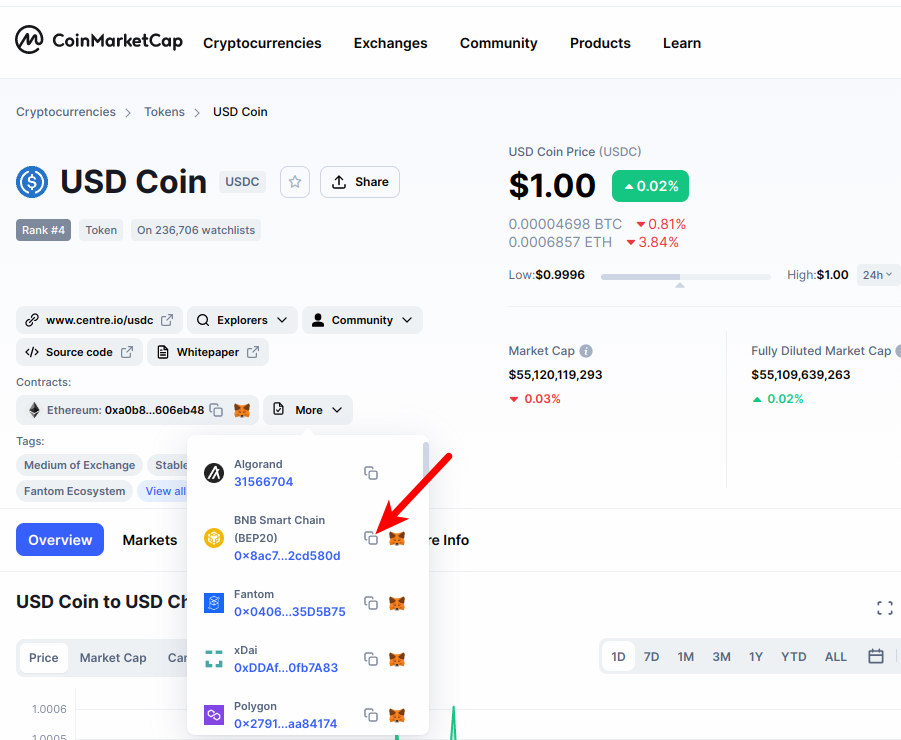
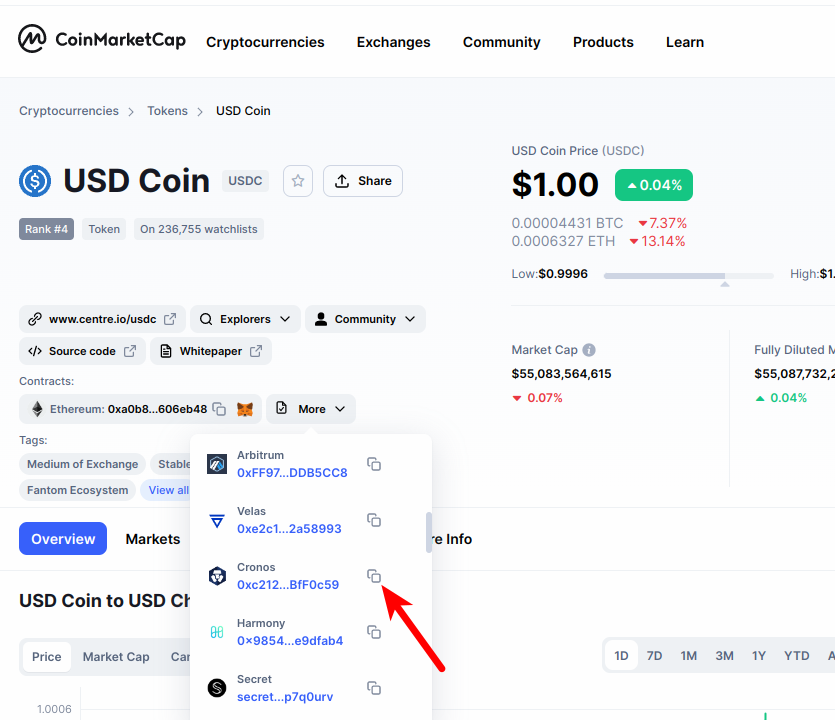
To get the contract address, go to the USDC token page on CoinMarketCap. On the page, click on [More], then scroll down on the dialog box until you find the USDC contract address for the Polygon network.
Now, click on the Copy icon next to the USDC Polygon contract address to copy it to your device clipboard.
2. Launch Metamask, unlock your wallet, and ensure Polygon is the selected network.
Launch the Metamask extension by clicking on the Metamask icon in the extensions area of your browser. Next, enter your account password and click on [Unlock] to unlock your wallet.
Since we will be adding the USDC coin (USDC) to Metamask on the Polygon network, you will want to ensure that the Polygon network has been added to your Metamask wallet and selected as the default network
If you haven’t added the Polygon Mainnet to your Metamask wallet, we have a good tutorial on how to add Polygon to Metamask easily on both the extension and mobile app. You will need to follow the steps in that article to add the network to your Metamask wallet before moving forward with this guide.
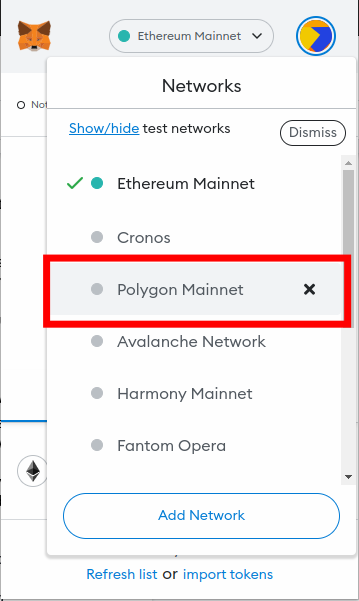
Once you have added the Polygon network to your wallet, select it as the default network as illustrated in the screenshot below.
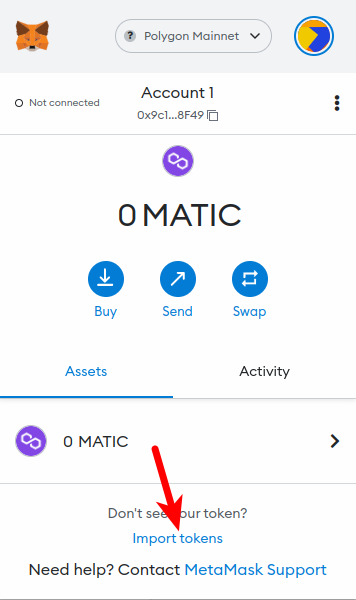
3. Scroll down and click on [Import tokens].
Now that you have added and selected the Polygon network as the default network on your Metamask wallet, go back to the Metamask main window and scroll down.
At the bottom of the page, click on [Import tokens].
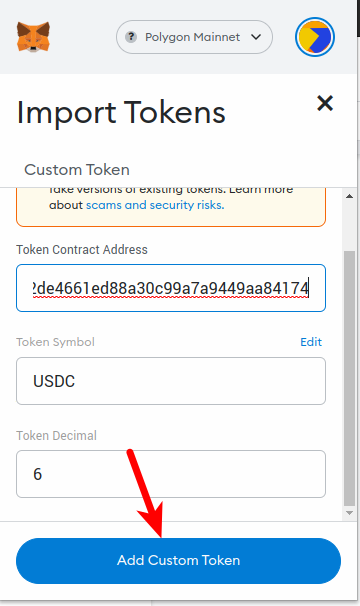
4. Paste the Contract Address and click [Add Custom Token].
On the token import window, paste the USDC contract address that you copied earlier from the CoinMarketCap website in the “Token Contract Address” field and wait a few seconds for Metamask to automatically fetch the Token Symbol and Token Decimal.
Once that’s done, click on [Add Custom Token].
5. Click on [Import tokens] to add USDC to Metamask on Polygon.
Finally, click on [Import tokens] to add USDC to your Metamask wallet on the Polygon network.
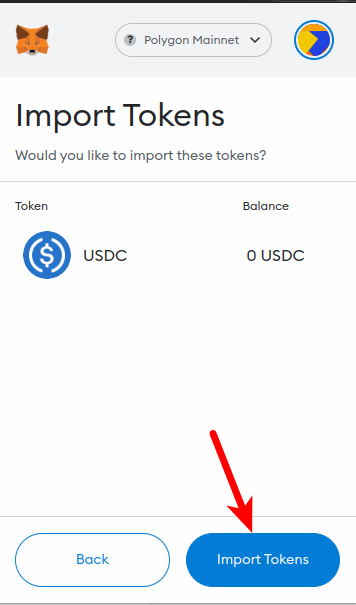
With this, you have successfully added USDC to Metamask on Polygon.
How To Add USDC To Metamask On The Binance Smart Chain (BSC)
Another way to add the USD Coin (USDC) to your Metamask wallet is by importing the contract address of BEP-20 USDC to your wallet on the Binance Smart Chain (BSC).
Below is how you can add USDC To Metamask on the Binance Smart Chain Network.
1. Copy the USDC contract address for the Binance Smart Chain (BEP-20 USDC).
To add the USD Coin to your Metamask wallet on the Binance Smart Chain, you first need to get the contract address from the USDC token on BSC.
To do this, go to the USDC token page on CoinMarketCap. On the page, click on [More], then scroll down on the dialog box until you find the USDC contract address for the BNB Smart Chain (BEP-20) network.
Now, click on the Copy icon next to the USDC BEP20 contract address to copy the address to your device clipboard.
2. Launch Metamask, unlock your wallet, and ensure the Binance Smart Chain is the selected network.
Launch the Metamask extension by clicking on the Metamask icon in the extensions area of your browser. Enter your account password and click on [Unlock] to unlock your wallet.
Since we will be adding the USDC coin (USDC) to Metamask on the Binance Smart Chain, you will want to ensure that the BSC Network is added and selected as the default network on your Metamask wallet.
If you haven’t added the Binance Smart Chain to your Metamask wallet, we have a good tutorial on how to add the BSC network to Metamask easily on both the extension and mobile app. You will need to follow the steps in that article to add the BSC network to your Metamask wallet before moving forward with this guide.
Once you have added the Binance Smart Chain to your wallet, select it as the default network as illustrated in the screenshot below.
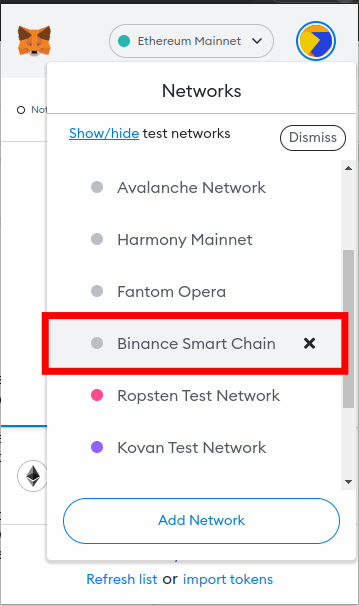
3. Scroll down and click on [Import tokens].
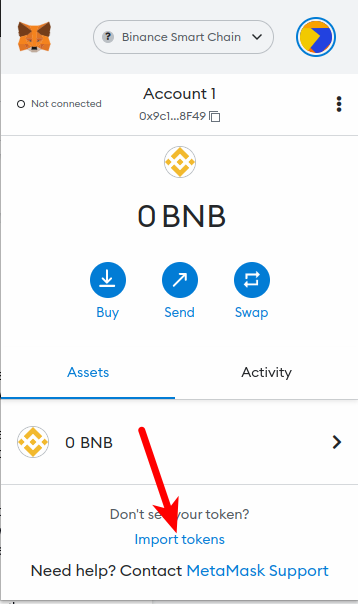
Now that you have added and selected the Binance Smart Chain network as the default network on your Metamask wallet, go back to the Metamask main window and scroll down to the bottom.
At the bottom of the page, click on [Import tokens].
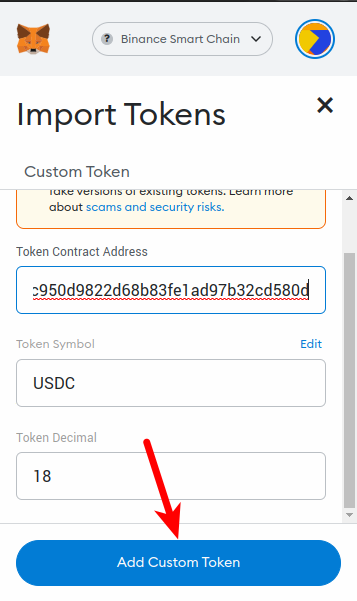
4. Paste the Contract Address and click [Add Custom Token].
On the token import window, paste the USDC contract address that you copied earlier from CoinMarketCap and wait a few seconds for Metamask to fetch the Token Symbol and Token Decimal automatically.
Once that’s done, click on [Add Custom Token].
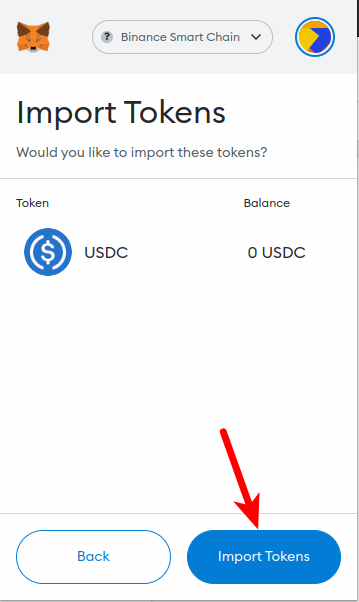
5. Click on [Import tokens] to add USDC to Metamask on the BSC Network.
Finally, click on [Import tokens] to add USDC to your Metamask wallet on the Binance Smart Chain network.
With this, you have successfully added USDC to Metamask on the Binance Smart Chain.
How To Add USDC To Metamask On The Cronos Network
The Cronos blockchain is another blockchain on which the USD Coin (USDC) is deployed and available.
To add USDC to Metamask on the Cronos network, you need to copy the correct contract USDC address for the Cronos chain and then import the token to your wallet using the contract address.
Below is how you can add USDC To Metamask on the Cronos chain.
1. Copy the USDC contract address for the Cronos chain.
To add the USD Coin (USDC) to your Metamask wallet on the Cronos Chain, you first need to get the contract address from the USDC token on Cronos.
To do this, go to the USDC token page on CoinMarketCap. On the page, click on [More], then scroll down on the dialog box until you find the contract address for USDC on the Cronos network.
Now, click on the Copy icon next to the USDC Cronos contract address to copy the address to your device clipboard.
2. Launch Metamask, unlock your wallet, and ensure the Binance Smart Chain is the selected network.
Launch the Metamask extension by clicking on the Metamask icon in the extensions area of your browser. Enter your account password and click on [Unlock] to unlock your wallet.
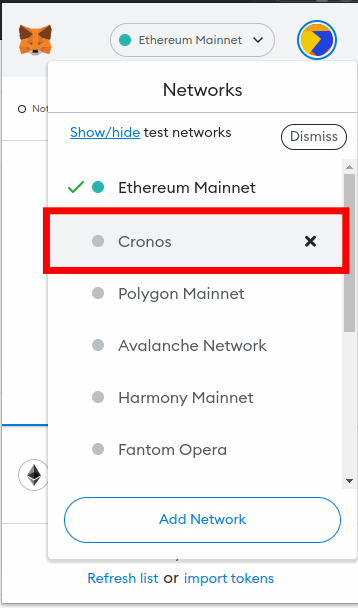
Since we will be adding the USDC coin (USDC) to Metamask on the Cronos Chain, you will want to ensure that the Cronos Main Network is added and selected as the default network on your Metamask wallet.
If you haven’t added the Cronos network to your Metamask wallet, we have a good tutorial on how to add Cronos to Metamask easily on both the extension and mobile app. You will need to follow the steps in that article to add the Cronos network to your Metamask wallet before moving forward with this guide.
Once you have added the Cronos mainnet to your wallet, select it as the default network as illustrated in the screenshot below.
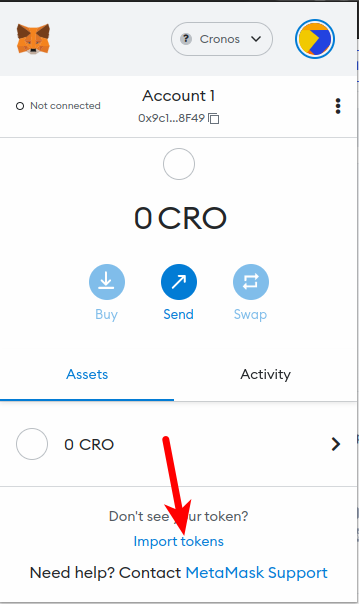
3. Scroll down and click on [Import tokens].
Now that you have added and selected the Cronos network as the default network on your Metamask wallet, go back to the Metamask main window and scroll down to the bottom.
At the bottom of the page, click on [Import tokens].
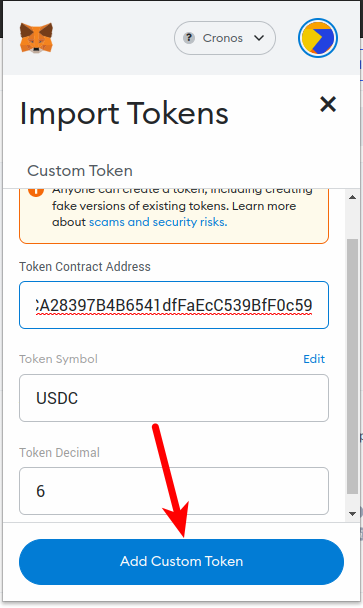
4. Paste the Contract Address and click [Add Custom Token].
On the token import window, paste the USDC contract address that you copied earlier from CoinMarketCap and wait a few seconds for Metamask to fetch the Token Symbol and Decimal automatically.
Once that’s done, click on [Add Custom Token].
5. Click on [Import tokens] to add USDC to Metamask on the Cronos Network.
Finally, click on [Import tokens] to add USDC to your Metamask wallet on the Cronos network.
How To Add USDC To Metamask On Avalanche
Below is how you can add USDC To Metamask on the Avalanche C-Chain.
1. Copy the USDC contract address for the Avalanche C-Chain.
To add the USD Coin (USDC) to your Metamask wallet on the Avalanche network, you first need to get the contract address from the USDC token on Avalanche.
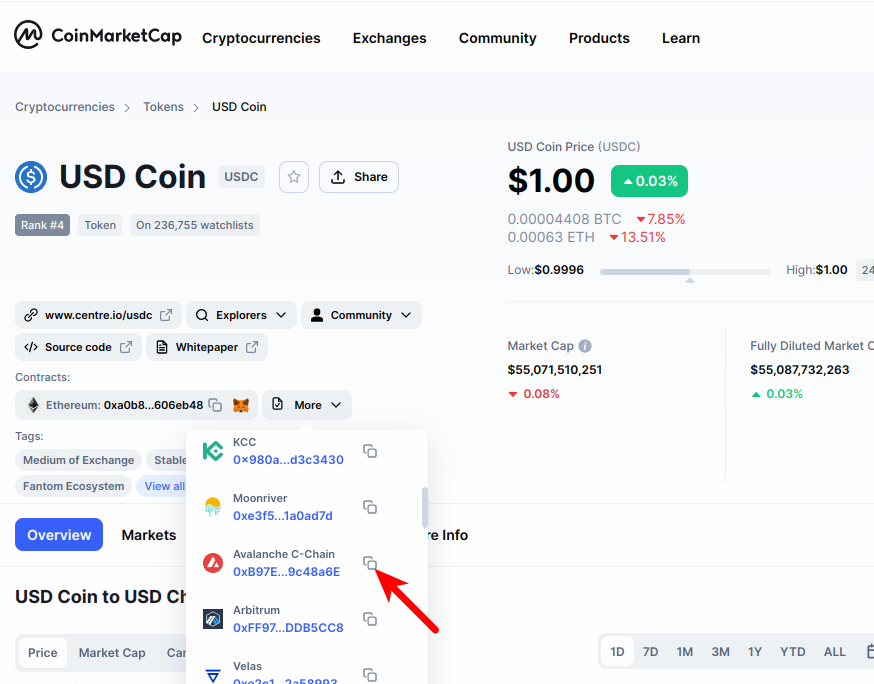
To do this, go to the USDC token page on CoinMarketCap. On the page, click on [More], then scroll down on the dialog box until you find the contract address of USDC on the Avalanche C-Chain.
Now, click on the Copy icon next to the USDC Avalanche contract address to copy the address to your device clipboard.
2. Launch Metamask, unlock your wallet, and ensure the Avalanche network is the selected network.
Launch the Metamask extension by clicking on the Metamask icon in the extensions area of your browser. Enter your account password and click on [Unlock] to unlock your wallet.
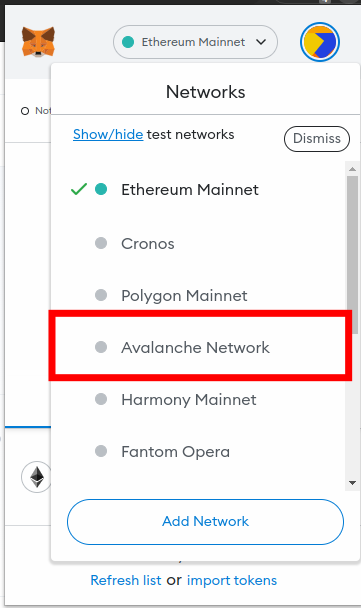
Since we will be adding the USDC coin (USDC) to Metamask on the Avalanche Chain, you will want to ensure that the Avalanche Mainnet is added and selected as the default network on your Metamask wallet.
If you haven’t added the Cronos network to your Metamask wallet, we have a good tutorial on how to add Avalanche to Metamask easily on both the extension and mobile app. You will need to follow the steps in that article to add the Avalanche network to your Metamask wallet before moving forward with this guide.
Once you have added the Avalanche mainnet to your wallet, select it as the default network as illustrated in the screenshot below.
3. Scroll down and click on [Import tokens].
Now that you have added and selected the Avalanche network as the default network on your Metamask wallet, go back to the Metamask main window and scroll down to the bottom.
At the bottom of the page, click on [Import tokens].

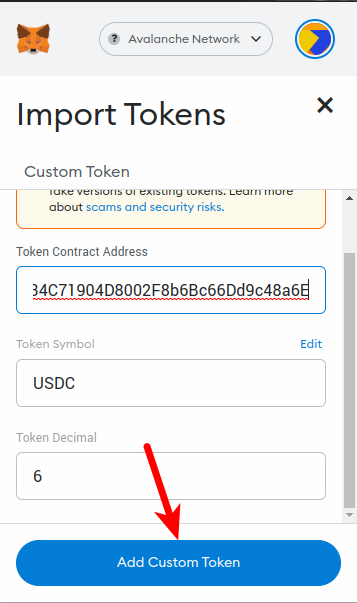
4. Paste the Contract Address and click [Add Custom Token].
On the token import window, paste the USDC contract address that you copied earlier from CoinMarketCap and wait a few seconds for Metamask to fetch the Token Symbol and Decimal automatically.
Once that’s done, click on [Add Custom Token].
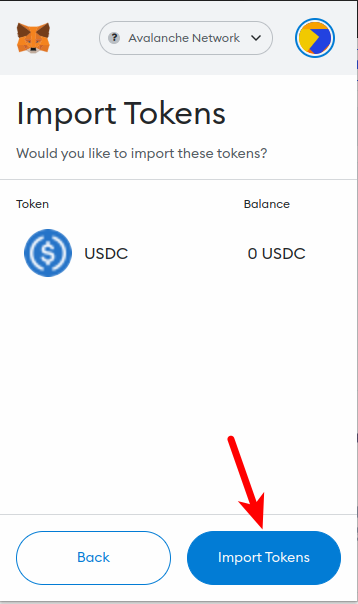
5. Click on [Import tokens] to add USDC to Metamask on the Avalanche Network.
Finally, click on [Import tokens] to add USDC to your Metamask wallet on the Avalanche network.
What’s The Cheapest Way To Send USDC To Metamask?
The fees associated with sending USDC from an exchange or external crypto wallet to your Metamask wallet largely depend on the network used for the transaction.
Networks like Ethereum are generally associated with higher gas fees while other networks like the Binance Smart Chain, Avalanche, and layer 2 solutions like the Polygon network where USDC is also implemented offer lesser gas fees when compared to Ethereum.
Wrapping Up
The USD Coin (USDC) is one of the largest stablecoins in the crypto space, pegged to the US Dollar. There are a few ways to add the USDC token to your Metamask wallet depending on the network you intend to use USDC on.
You can add USDC to your Metamask wallet on the Ethereum network by simply selecting the Ethereum Mainnet as the default network on your wallet. After that, click on [import tokens] at the bottom of the page then search for USDC and add the token to your wallet.
On other networks like Polygon, Cronos, Avalanche, and the Binance Smart Chain, you first need to copy the correct contract for USDC on the network you intend to add the token to. Next, head over to your Metamask wallet and select your network of choice and add USDC to that network using the contract address you copied.
And that’s about it. If you were searching for a tutorial on how to add USDC to your Metamask wallet, we hope you found this guide helpful.
