
The explosive growth we have witnessed in the decentralized finance space in recent years has led to the emergence of a ton of blockchains – each blockchain with its own unique benefits and features when compared to the others.
Two of the biggest names when it comes to blockchains in the decentralized finance space are the Binance Smart Chain (or BNB Smart Chain) and the Avalanche chain.
Although both blockchains are quite similar since they both offer high performance, compatibility with the Ethereum virtual machine, low transaction fees, and more, many users still find themselves needing to move their assets from one blockchain to another.
To move crypto assets across multiple blockchains, you need to use a cross-chain bridge that supports both the source and destination blockchains.
If you’re looking to bridge from BSC to Avalanche, you’re on the right page. In this article, we will explore the best way to bridge assets from the BNB Chain to Avalanche.
Whether you are an experienced DeFi user or new to cryptocurrencies and DeFi in general, this guide will provide valuable information on the steps required to move your crypto assets from the BNB Smart Chain to Avalanche.
How To Bridge From BSC To Avalanche (Step By Step Guide)
To bridge your crypto assets from the BNB Smart Chain (BSC) to Avalanche, you will need to use any of the secure cross-chain crypto bridges that support bridging tokens across the BNB Chain and Avalanche.
If you want to bridge to Avalanche from BSC, we recommend using Synapse Protocol Bridge.
The Synapse Protocol Bridge is a secure cross-chain protocol that enables the transfer of assets between different EVM-compatible blockchain networks including the BNB Chain and Avalanche.
To bridge from BSC to Avalanche using the Synapse Protocol Bridge, you have to first connect your wallet to the platform on the BNB Chain. After connecting your wallet, simply select the origin and destination chains, select the token to bridge, then enter an amount and approve the transaction on your wallet.
Below is a step-by-step guide showing how you can bridge your assets from BSC to Avalanche.
Step 1: Add the BNB Smart Chain and Avalanche to your wallet.
Before bridging, you have to first ensure that your wallet is configured to work with both the source and destination chains – in this case, the BNB Smart Chain and Avalanche.
If you use Metamask to manage your crypto assets, then adding a network to your wallet is an easy and straightforward process. You can either choose to add the network to your wallet manually or automatically via ChainList.
To add a network to your Metamask wallet using ChainList, visit the ChainList website on your web browser (with Metamask installed) and connect your wallet to the platform.
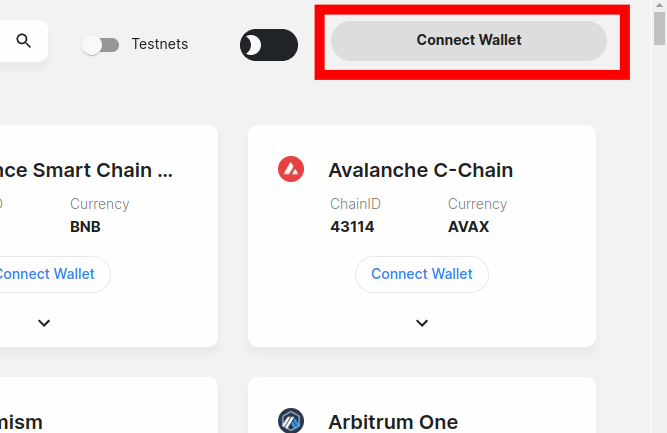
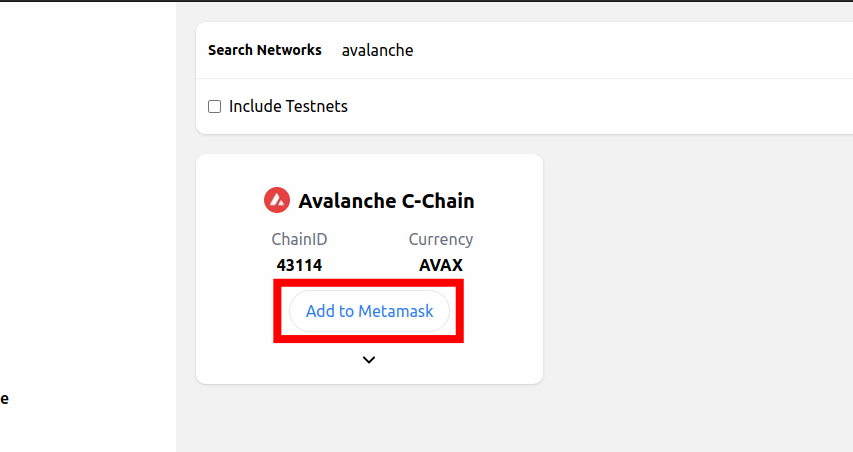
After connecting your wallet to the platform, simply type in the name of the network in the search bar and click the [Add to Metamask] on the correct option from the search results then approve the action on the Metamask popup window to add the network to your wallet.
If you need detailed step-by-step guides on how to add both networks to your Metamask wallet, you check out some of our older articles below.
Step 2: Visit the Synapse Protocol Bridge website and connect your wallet.
After adding the required networks to your Metamask wallet, you will need to visit the Synapse Protocol Bridge webpage on your web browser (with a crypto wallet extension installed) and connect your wallet to the platform before bridging your assets to AVAX from BSC.
To connect your wallet, visit the Synapse Protocol Bridge [https://synapseprotocol.com/] then click the [Connect wallet] button.

Next, select your crypto wallet of choice from the list of Synapse-compatible crypto wallets on the dialog and confirm the connection on your wallet.
Since we’re using Metamask for this guide, we will be selecting “Metamask” from the dialog and approving the connection on the pop-up Metamask window.
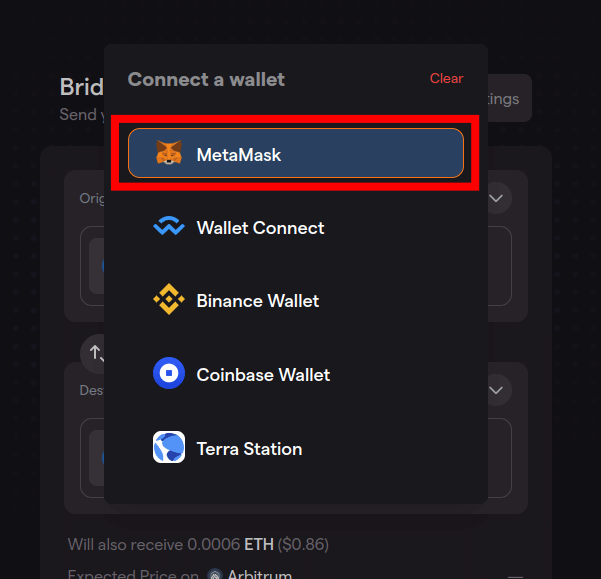
If you’re using another wallet shown in the dialog, then go ahead and select it on the list. For wallets that are not on the list (eg Trust Wallet), you can use WalletConnect to link your wallet to the platform.
Step 3: Select the source and destination chains for the transaction.
After connecting your wallet to the Synapse bridge, the next step will be to select the correct source and destination chains to be used for the transaction.
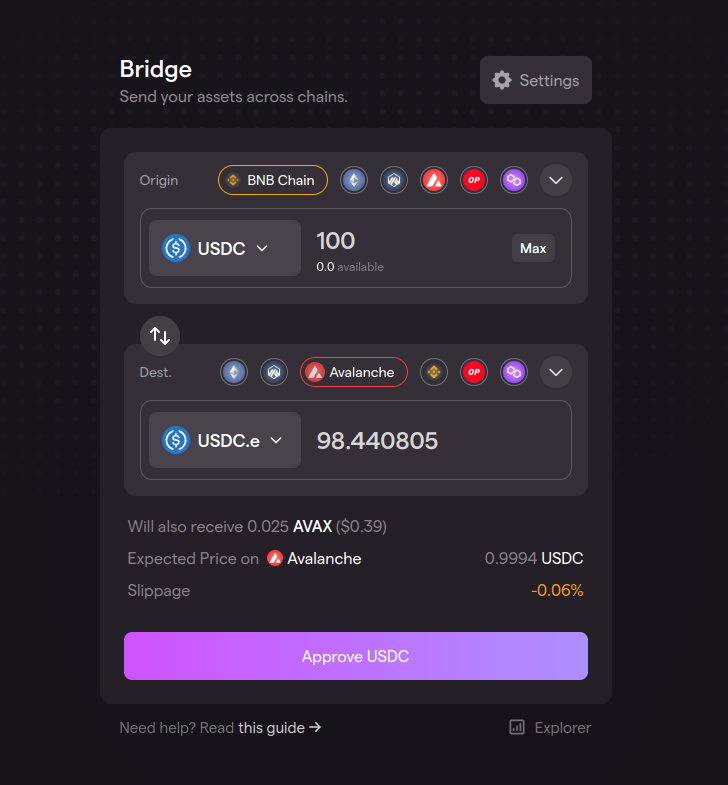
To do this, select the BNB Chain in the “Origin” section to set the BNB Smart Chain (BSC) as the source chain for the transaction then choose Avalanche in the “Dest.” (Destination) section to set Avalanche as the destination chain of the transaction.]
Step 4: Select the token to bridge then enter an amount.
Next, you will need to select the token (or tokens) involved in the transaction.
The Synapse Protocol Bridge allows users to bridge any of the popular stablecoins USDT, USDC, BUSD, and nUSD from the BNB Smart Chain to Avalanche. You can also bridge other tokens including SYN, HIGH, H2O, etc to Avalanche from BSC.
For this guide, we will be bridging USDC from BSC to Avalanche so we will select “USDC” as both the source and destination token for the transaction. The USDC equivalent on Avalanche is “USDC.e” just in case you see a different token showing up in the destination section – both tokens are the same.
Once you have selected the Origin and Destination tokens for the transaction, enter the amount you want to bridge and review the estimated amount to be received (on Avalanche).
Step 5: Approve token spend and confirm the transaction on your wallet.
Next, click on [Approve *token name*] (eg “Approve USDC” in our case) then click [Confirm] on the Metamask popup window to grant the Synapse Protocol Bridge approval to spend the token to be bridged on your wallet.
After approving the token spend on your wallet, click [Bridge *token name*] (eg “Bridge USDC“) then approve the transaction on your wallet.
Bridging assets from other chains from BSC to the AVAX network on the Synapse Protocol Bridge can take between 2mins to 3mins to complete depending on the current network conditions of the Binance Smart Chain and Avalanche.
The Synapse Protocol Bridge fees are also as low as it gets but still depend on the chains involved in the transaction. Since both chains involved in the transaction are known for low gas fees, you should expect to pay very little fees in gas to bridge your crypto to Avalanche from BSC.
Wrapping Up
Bridging your crypto from the BNB Smart Chain to Avalanche opens up a new world of opportunities since both blockchains, although quite similar, possess their own unique benefits and features.
In this article, we showed you the steps involved when bridging assets from BSC to AVAX. Bridging across both blockchains requires a cross-chain protocol that supports both blockchains and since they’re both EVM-enabled chains, we recommend using the Synapse Protocol Bridge.
And that will be it for this article. If you were searching for a detailed step-by-step guide showing how to move assets from the BNB Chain to Avalanche, we hope you found this guide helpful.
