
In recent years, Decentralized Finance has really taken the crypto space by storm with many cryptocurrency enthusiasts moving from accessing and managing their crypto portfolio via centralized exchanges/parties to new decentralized blockchains, exchanges, and protocols which offer more control over their assets.
With the plethora of blockchains available right now in the DeFi space, it can be hard to find the right network for your needs. If you need a fast and cost-effective blockchain, then recommend considering the Cronos chain.
Cronos is a decentralized network that runs on the Cosmos SDK, which is one of the most popular frameworks for building interoperable blockchains.
To fully access all the features and capabilities of the Cronos ecosystem, you will need to bridge your assets to the network using any of the cross-chain bridges that support both the source blockchain and the Cronos chain.
In this article, you will find out how to bridge to Cronos from other popular chains including Ethereum, BSC, Polygon, and more in a few steps.
Whether you’re a seasoned blockchain user or a newcomer to the space, this guide will help you understand how to move your assets to the Cronos chain easily.
How To Bridge Crypto To Cronos Chain From Polygon, Ethereum, BSC & More.
To move your crypto assets from any of the popular decentralized and EVM-compatible blockchains to the Cronos ecosystem, you will need to use a cross-chain bridging protocol that supports bridging assets across both chains.
There are many cross-chain bridging solutions available right now but we recommend using the Synapse Protocol Bridge when attempting to bridge assets from other chains to Cronos.
The Synapse Protocol Bridge is a tool that enables the transfer of assets between different blockchain networks.
To bridge to Cronos chain using the Synapse Protocol bridge, you first have to connect your Ethereum-compatible crypto wallet (like Metamask) to the platform, select the source chain, and destination chain, select the token to bridge then enter an amount and approve the transaction on your wallet.
Below is a step-by-step guide showing how you can bridge to Cronos using the Synapse Protocol Bridge.
Step 1 Add the Cronos Chain (CRO) to your wallet.
The very first step to take when attempting to bridge your crypto assets to Cronos is to ensure that your crypto wallet is configured to work with the Cronos mainnet.
If you use Metamask, then adding the Cronos network to your wallet is a very quick and easy process.
To add Cronos to Metamask, launch the Metamask extension and unlock your wallet. Next, click on the network selector box and select [Add network].
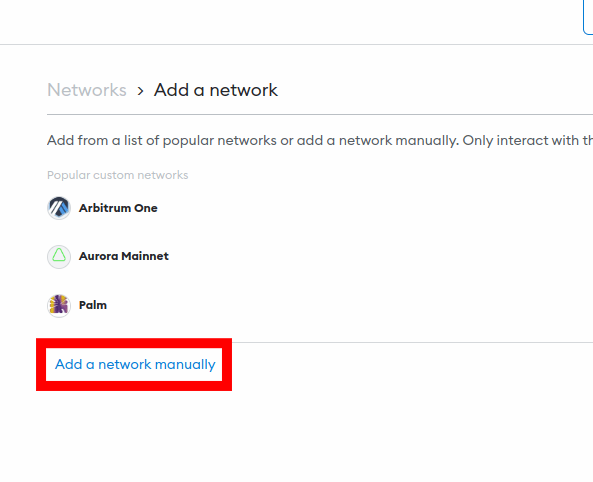
Now you should see a list of preconfigured networks that you can add to your wallet automatically by clicking a button. Since the Cronos network is not included on the list of Metamask pre-configured networks, you have to add the network manually so click [Add a network manually].
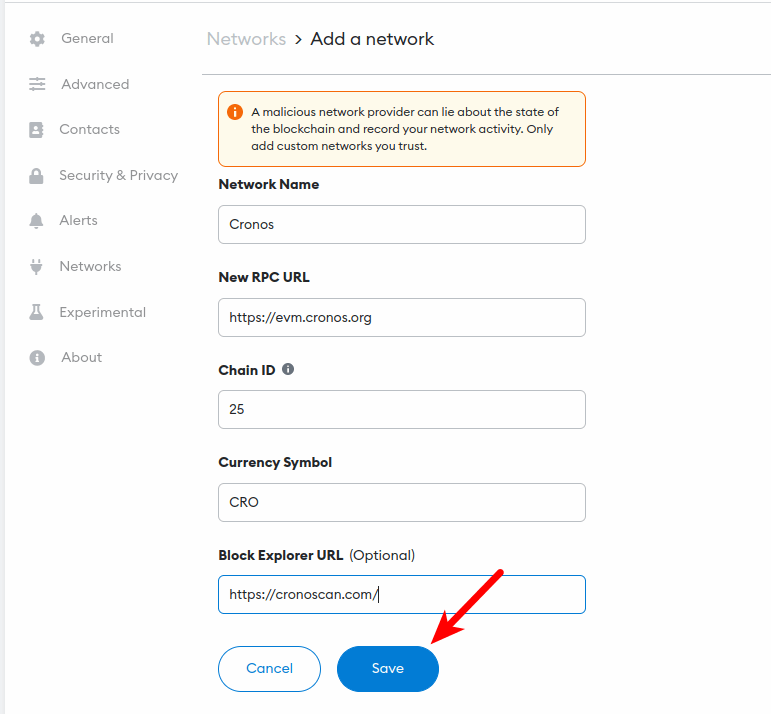
After that, enter the RPC details outlined below in their respective fields and click [Save] to add the network to your wallet.
- Network Name: Cronos
- New RPC URL: https://evm.cronos.org
- Chain ID: 25
- Currency Symbol: CRO
- Block Explorer URL: https://cronoscan.com/
Alternatively, you can use the ChainList.org website to add the Cronos network to your wallet. ChainList allows users to add any of the popular Ethereum-enabled networks to their wallets automatically.
Also, if you have added the Cronos network to your Metamask wallet in the past, then you can skip this step since you don’t actually need to repeat the process all over again.
Step 2: Visit the Synapse Protocol website and connect your wallet.
Now that you’re done with adding the Cronos network to your wallet, you will need to visit the Synapse Protocol website and connect your wallet to the platform before bridging your assets to Cronos.
To connect your wallet, visit the Synapse Protocol Bridge [https://synapseprotocol.com/] then click the [Connect wallet] button.

Next, select your crypto wallet from the list of Synapse-compatible crypto wallets on the dialog and confirm the connection.
Since we’re using Metamask for this guide, we will be selecting “Metamask” from the dialog and approving the connection on the pop-up Metamask window.
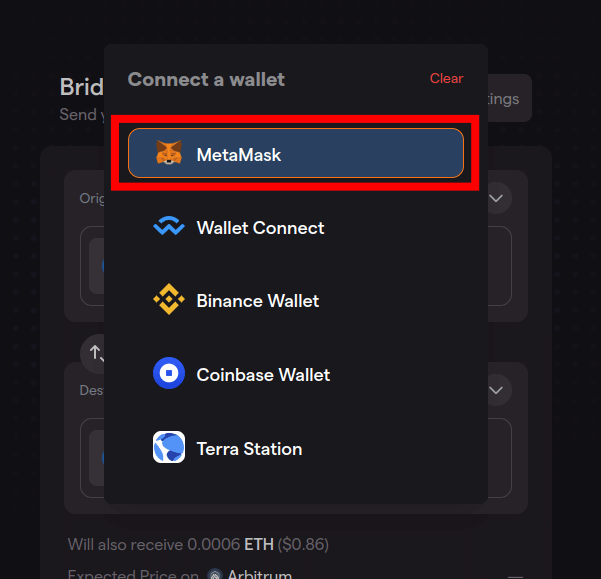
If you’re using another wallet shown in the dialog, then go ahead and select it. For wallets that are not on the list (eg Trust Wallet), you can use WalletConnect to link your wallet to the platform.
Step 3: Select the source and destination chains.
After connecting your wallet to the platform, the next step is to select the source and destination chains to be used for the transaction.
To do this, select the chain (e.g Ethereum, Polygon, BSC, etc) you’re bridging from in the “Origin” section then select Cronos in the “Dest.” (Destination) section to set Cronos as the destination chain of the transaction.
Step 4: Select the token to bridge then enter an amount.
Next, you will need to select the token (or tokens) involved in the transaction.
Depending on the selected source/origin chain, Synapse allows users to bridge ETH and some of the popular stablecoins including USDT, USDC, and DAI to Cronos but you can only receive USDC, SYN, gOHM, or nUSD on Cronos.
For this guide, we will simply be bridging USDC from Ethereum to Cronos so we will select “USDC” as both the source and destination token.
When you’re done selecting both the Origin and Destination tokens to be involved in the transaction, enter the amount you want to bridge and review the estimated amount to be received (on Cronos).

Step 5: Approve token spend and confirm the transaction on your wallet.
Next, click on [Approve *token name*] (eg “Approve USDC“) then click [Confirm] on the Metamask popup window to grant Synapse approval to spend the token to be bridged on your wallet.
After approving the token spend on your wallet, click [Bridge *token name*] (eg “Bridge USDC“) then approve the transaction on your wallet.
Bridging assets to Cronos from other chains using the Synapse Protocol Bridge can take between 2 – 3 Minutes depending on the current network conditions for both the source and destination chains. Fees are also minimal but still depend on the chains involved in the transaction.
Conclusion
Bridging your crypto assets to the Cronos network can open up new opportunities for trading, staking, and participating in the growing ecosystem of decentralized applications (DApps) and services available on this chain.
To move your assets to Cronos from any of the popular EVM-enabled blockchains including chains like Ethereum, Polygon, BSC, Fantom, and more, you will need to use a cross-chain bridge that supports both your source chain/blockchain network of choice and the native Cronos chain.
For bridging assets to the Cronos ecosystem, we recommend using the Synapse Protocol Bridge. This is because the Synapse Protocol Bridge is designed to be fast and cost-effective, with low fees and minimal transaction times making it an ideal solution for users who need to transfer assets across various EVM chains.
By following the step-by-step guide we included earlier in the article, you can easily transfer your assets from other blockchains, such as Ethereum or Binance Smart Chain, to Cronos, and take advantage of its unique features and capabilities.
