
Dog-themed tokens and blockchains are some of the hottest trends in the DeFi space right now with tokens like Dogecoin, Shiba Inu, and other dog-themed tokens growing in market cap to the tune of trillions over the past year.
One of the popular dog-themed blockchains available right now is the Dogechain network which is a layer 2 network for the native Dogecoin blockchain. This chain claims to bring NFTs, games, and DeFi to Dogecoin holders thereby allowing them to access more features that are not natively available on the Dogecoin chain itself.
To access all the features the Dogechain network offers, you will need to first bridge your assets to the blockchain.
Bridging assets to Dogechain from any of the popular EVM networks requires a cross-chain bridge that supports bridging across both the source and destination blockchains.
In this article, you will learn how to bridge to Dogechain from other EVM chains including popular networks like Ethereum, Polygon, Avalanche, and the BNB Chain.
How To Bridge Assets To Dogechain (Step By Step Guide)
To move your crypto holdings from other chains to the Dogechain blockchain you will need to use a cross-chain bridging protocol that supports both the source chain and the destination chain (i.e Dogechain).
As of now, there is a native Dogechain bridge but it only supports bridging Dogecoin to the Dogechain network. If you want to bridge from other EVM networks, then we recommend using the Synapse protocol bridge.
The Synapse Protocol Bridge is a tool that enables the transfer of assets between different blockchain networks. Specifically, the bridge allows users to transfer assets between most of the popular EVM networks while charging some of the lowest fees possible.
Below contains a step-by-step guide showing how you can bridge to the Dogechain network from other networks using the Synapse Protocol Bridge.
Note: If you want to bridge Dogecoin to the Dogechain network, then consider using the native Dogechain bridge instead of Synapse.
Step 1: Add the Dogechain network to your Metamask wallet.
The first step to consider when bridging assets to a particular chain is to ensure that the chain has been added to your crypto wallet since you will be receiving tokens on the network after the bridging process is complete.
If you use the Metamask crypto wallet, then adding a network to your wallet is easy.
To add the Dogechain network to Metamask in one click, visit the ChainList website on your web browser and connect your wallet to the platform.
After connecting your wallet, type in “Dogechain” in the search bar then click [Add to Metamask] on the result which reads “Dogechain Mainnet“.
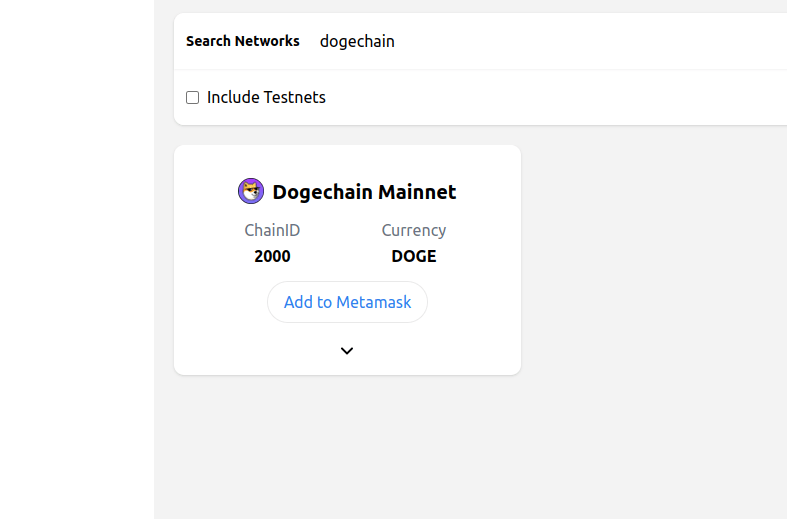
Now, approve the network addition on the popup Metamask window to add the network to your wallet.
If you have added the Dogechain network to your Metamask wallet in the past, then you can skip this step since you don’t need to repeat the process all over again.
Step 2: Visit the Synapse Protocol website and connect your wallet.
Now that you’re done with adding the Dogechain network to your wallet, you will need to visit the Synapse Protocol website and connect your wallet to the platform before bridging your assets to Dogechain.
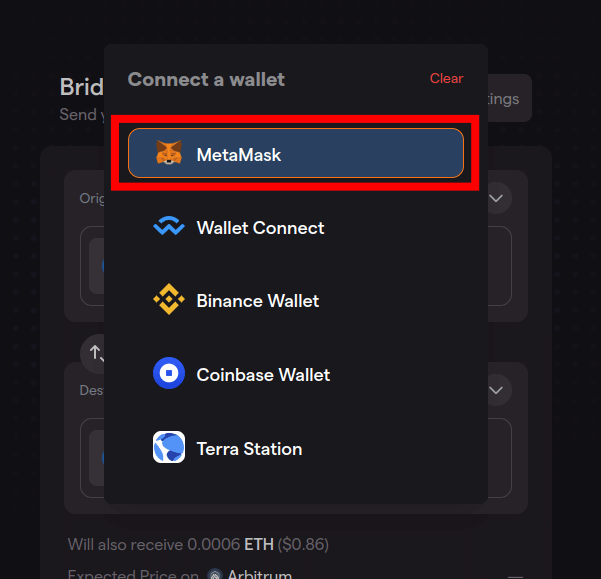
To connect your wallet, visit the Synapse Protocol Bridge [https://synapseprotocol.com/] then click the [Connect wallet] button.

Next, select your crypto wallet from the list of Synapse-compatible crypto wallets on the dialog and confirm the connection.
Since we’re using Metamask for this guide, we will be selecting “Metamask” from the dialog and approving the connection on the pop-up Metamask window.
If you’re using another wallet shown in the dialog, then go ahead and select it. For wallets that are not on the list (eg Trust Wallet), you can use WalletConnect to link your wallet to the platform.
Step 3: Select the source and destination chains.
After connecting your wallet to the Synapse bridge, the next step will be to select the correct source and destination chains to be used for the transaction.
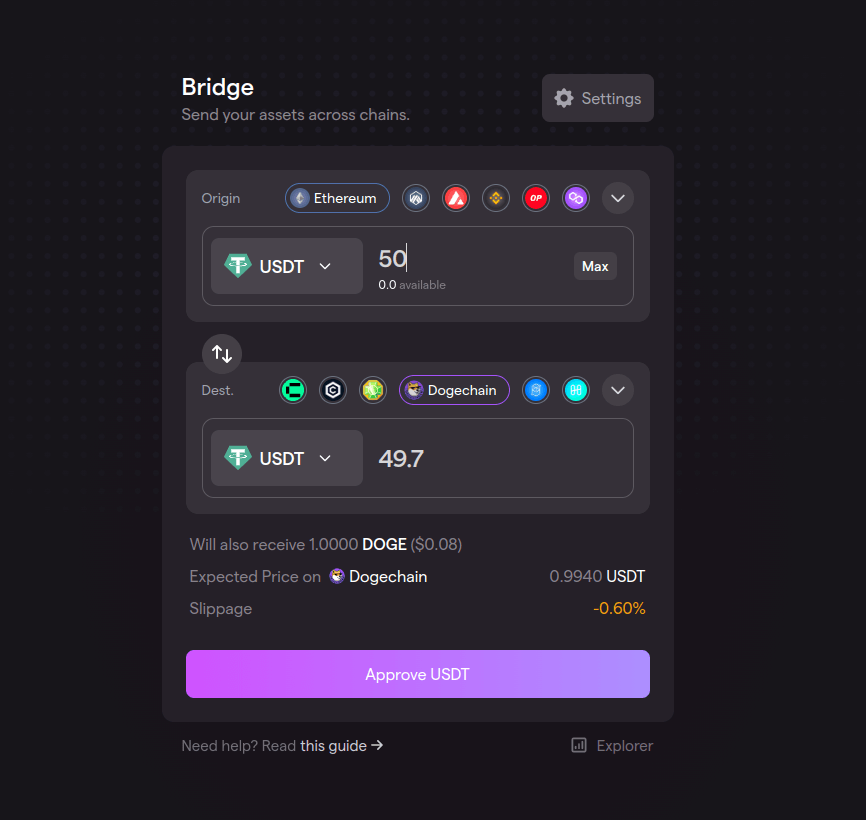
To do this, select the chain (e.g Ethereum, Polygon, BNB Chain, etc) you’re bridging from in the “Origin” section then choose Dogechain in the “Dest.” (Destination) section to set Dogechain as the destination chain of the transaction.
Step 4: Select the token to bridge then enter an amount.
Next, you will need to select the token (or tokens) involved in the transaction.
Depending on the selected source/origin chain, Synapse allows users to bridge ETH and some of the popular tokens including stablecoins USDT, USDC, and DAI, and others like SYN, WBTC, etc to Dogechain.
For this guide, we will simply be bridging USDT from Ethereum to Dogechain so we will select “USDT” as both the source and destination token for the transaction.
When you’re done selecting the Origin and Destination tokens to be involved in the transaction, enter the amount you want to bridge and review the estimated amount to be received (on Dogechain).
Step 5: Approve token spend and confirm the transaction on your wallet.
Next, click on [Approve *token name*] (eg “Approve USDT“) then click [Confirm] on the Metamask popup window to grant Synapse approval to spend the token to be bridged on your wallet.
After approving the token spend on your wallet, click [Bridge *token name*] (eg “Bridge USDT“) then approve the transaction on your wallet.
Bridging assets from other chains to the Dogechain network on the Synapse Protocol Bridge can take between 2mins to 3mins to complete depending on the current network conditions of the chains involved in the transaction.
The Synapse Protocol Bridge fees are also as low as it gets but still depend on the chains involved in the transaction.
Wrapping Up
Bringing assets across multiple blockchains is one of the most amazing features we have seen in the decentralized finance space in recent times since it allows users to seamlessly move their assets from one blockchain to another while accruing very minimal fees.
To bridge your crypto assets to the Dogechain network, you will need to use any of the cross-chain bridging solutions available right now that support both the origin and destination blockchains.
We generally recommend using the Synapse protocol bridge when bridging accross multiple EVM networks since it offers faster transaction speeds while ensuring users pay the lowest fees possible for each transaction.
Whether you’re interested in trading cryptocurrencies, staking your assets, or participating in the growing ecosystem of DApps and services, the Dogechain network has a lot to offer. With its unique blend of meme culture and innovative technology, Dogechain is quickly becoming a popular choice for blockchain enthusiasts worldwide.
