
EVMOS is a decentralized inter-blockchain communication protocol that aims at bringing Ethereum-based apps and assets to the Cosmos ecosystem.
It is built using the Cosmos SDK and the protocol is currently one of the safest, most secure, and most decentralized ways to move assets across different blockchains.
Since EVMOS is an EVM-based network, you can add the network to your Metamask wallet and in this article, we will walk you through all the steps involved in adding EVMOS to Metamask.
Here, you will learn how to add the EVMOS network to your wallet on both the Metamask web browser extension as well as the Metamask mobile app for both Android and iOS devices.
How To Add EVMOS To Metamask (Quick Guide)
- Launch Metamask and unlock your account.
- Click on the network selector box.
- Select [Add network].
- Click [Add a network manually].
- Enter the correct Evmos Mainnet RPC details.
- Hit [Save] to add the network to Metamask.
How To Add Evmos Network To Metamask (Step By Step Guide)
To get the EVMOS token on your Metamask wallet as well as access the EVMOS network as well and all its features with your wallet, you have to add the network to Metamask first.
Before attempting to add the Evmos network to your Metamask wallet, you need to get the correct RPC details of the blockchain first. After that, launch Metamask, unlock your wallet, and add the network to your wallet by filling out the required field correctly using the RPC details of the network.
Below is a step-by-step guide showing how to add Evmos to Metamask easily.
Step 1: Launch Metamask and unlock your wallet.
First, open the Metamask extension on your browser and unlock your wallet. To do this, simply click on the Metamask icon in the extensions/add-ons area of your web browser and enter your account password and click [Unlock] to unlock the extension.
If you haven’t installed the correct version of the Metamask extension (or addon) for your web browser, head over to the Metamask download page and install the extension. Next, launch the extension and set up a new wallet or import an existing wallet using your 12-word secret recovery phrase.
After that, simply set up an account password for your Metamask wallet and you should be good to go.
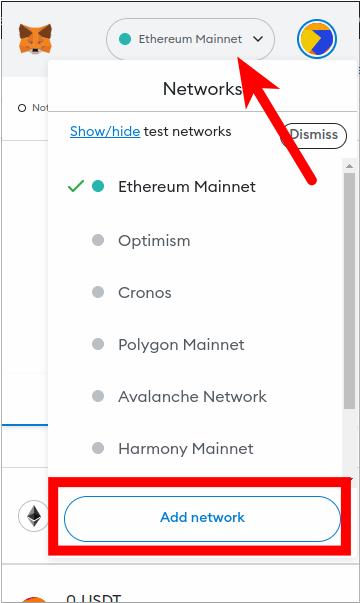
Step 2: Click on the Network Selector Box.
On the Metamask main window, click on the network selector box to reveal a dialog with all available (configured) networks on your Metamask wallet.
Step 3: Select [Add network].
Next, click the [Add network] button to add a new network to your wallet.
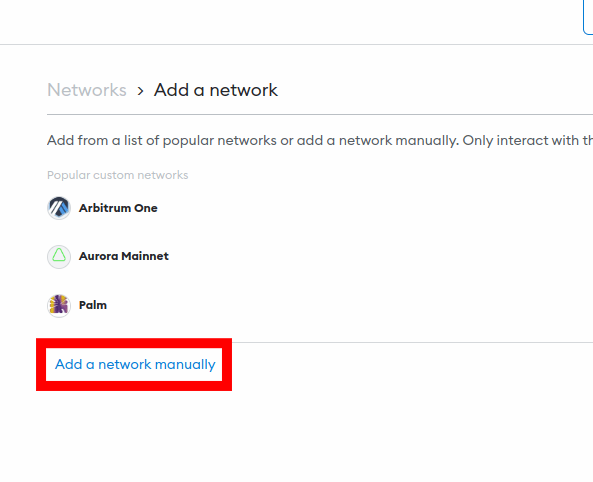
Step 4: Click [Add a network manually].
Now, you should see a list of popular networks which can be added to your wallet automatically.
Since Evmos is not one of these networks which can be added to your wallet automatically directly on Metamask, you will have to add it manually.
Click [Add a network manually] to add a new network to your wallet manually.
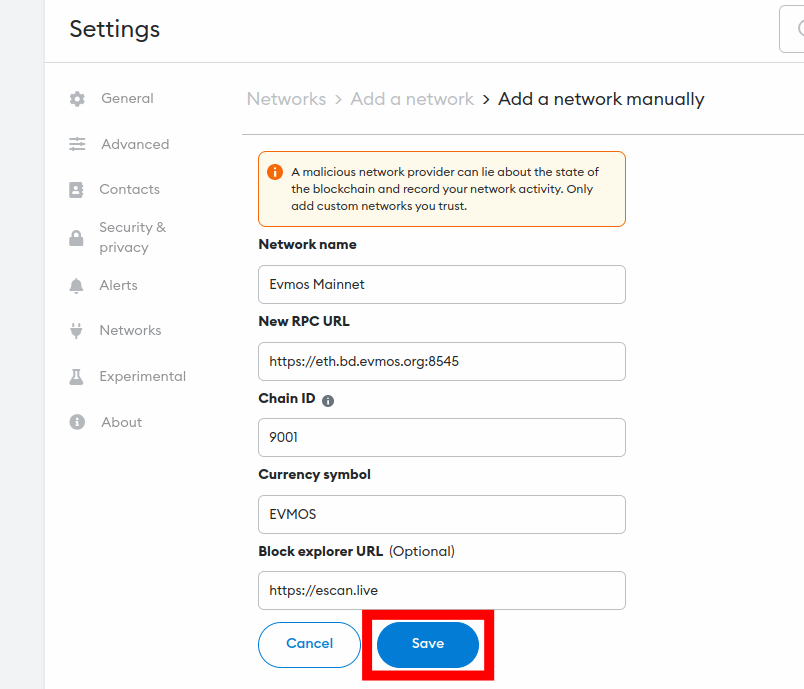
Step 5: Enter the correct RPC details for the Evmos Mainnet and click [Save].
On the next page, enter the correct RPC details for the EVMOS Emerald Mainnet outlined below in the appropriate fields.
- Network Name: Evmos Mainnet
- New RPC URL: https://eth.bd.evmos.org:8545
- Chain ID: 9001
- Currency Symbol: EVMOS
- Block Explorer URL: https://escan.live
Once you have entered all the above information in the appropriate fields, click [Save] to add EVMOS to your Metamask wallet.
If you wish to connect your wallet to the EVMOS testnet and not the mainnet, then use the RPC details below to add the EVMOS testnet to your Metamask wallet.
- Network Name: Evmos Testnet
- New RPC URL: https://eth.bd.evmos.dev:8545
- Chain ID: 9000
- Currency Symbol: tEVMOS
- Block Explorer URL: https://evm.evmos.dev
Also, if you want to run a local EVMOS node on your computer via Metamask, then use the RPC details below.
- Network Name: Evmos Local
- New RPC URL: http://localhost:8545/
- Chain ID: 9000
- Currency Symbol: tEVMOS
- Block Explorer URL: leave empty
After this, the EVMOS network (mainnet/testnet/local) should be added and automatically selected as the default network on your Metamask wallet.
If it is not selected as the default network on your wallet, go back to the Metamask main window and click on the network selector box then select “Evmos Mainnet” (or Testnet/Local depending on which one you added) from the list of available networks on the dialog to set Evmos as the default network on your wallet.
How To Add EVMOS To Metamask Using ChainList
While you can always add the Evmos network to your Metamask wallet manually using the RPC details of the network which we provided earlier, you can also add the network to your wallet automatically using ChainList without having to fill in the RPC details yourself.
To add the Evmos network to your wallet automatically via ChainList, you have to first connect your wallet to the platform and approve the connection.
After connecting your wallet, search for the network you want to add by typing the network name in the search bar (Evmos in this case), select the correct option from the search results, and add the network to your wallet.
Here is a detailed guide showing how you can add the Evmos network to your Metamask wallet using ChainList.
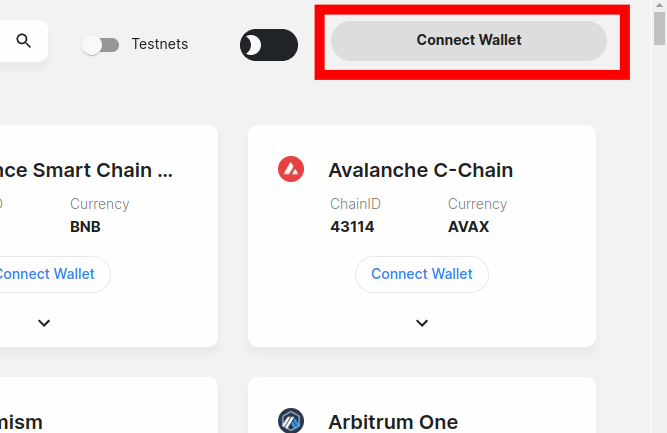
Step 1: Connect your Metamask wallet to the ChainList.org website.
Before you can add any network to your Metamask wallet via ChainList, you first have to connect your wallet to the website and approve the connection.
To connect your Metamask wallet to the platform, open the ChainList website [https://chainlist.org/] on a new tab on your web browser then click [Connect Wallet] on the homepage to connect your wallet to the platform.
Next, you will need to approve the connection request on Metamask. To do this, simply select the account (or accounts) you want to connect to ChainList on the pop-up Metamask window and click [Next] and then [Connect] to approve the connection.
Step 2: Type in “Evmos” in the search bar.
Next, you need to search for the Evmos Mainnet and select the correct option from the search results. To do this, simply type in “Evmos” in the search bar and select the correct option from the search results.

If you intend to add the Evmos Testnet to your wallet via ChainList and not the Mainnet, simply tick the “Include Testnets” checkbox and select “Evmos Testnet” from the search results.
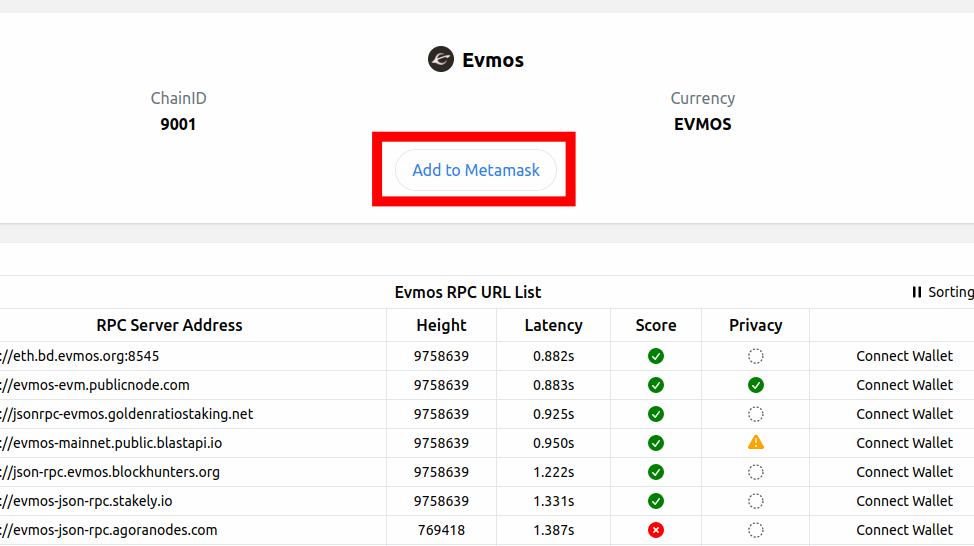
Step 3: Click [Add to Metamask] to add the network to your wallet.
Now, click the [Add to Metamask] button to add the Evmos Mainnet to your Metamask wallet.
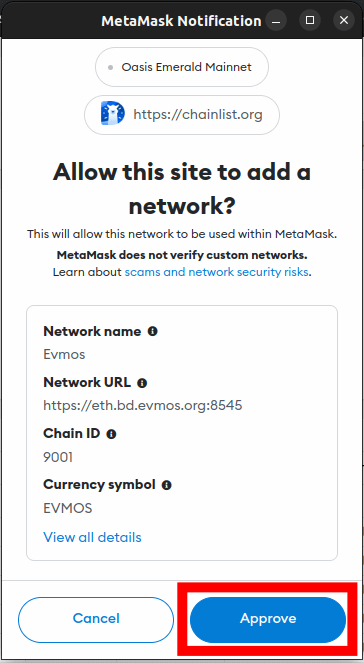
Step 4: Approve the action on Metamask.
Next, click [Approve] on the popup Metamask window to approve the addition of the Evmos Mainnet to your wallet.
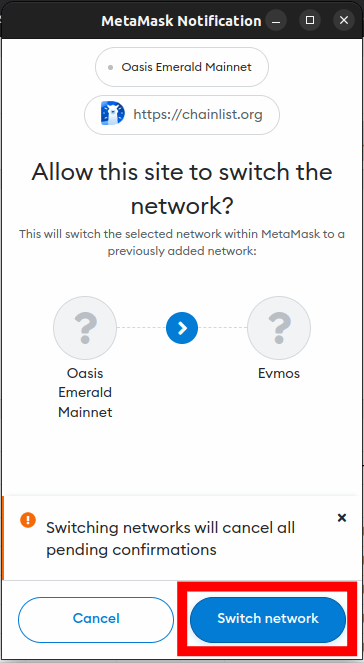
Finally, click [Switch network] to switch the default network on your wallet from a previously added network to the Evmos Mainnet. You can skip this by clicking [Cancel] if you don’t want to switch the default network on your wallet.
With this, you have successfully added the Evmos Mainnet to your Metamask wallet automatically using ChainList.
How To Add EVMOS Network On The Metamask Mobile App
To add the Evmos network to the Metamask mobile app, follow the steps outlined below.
Step 1: Open the Metamask app and unlock your wallet.
First, launch the Metamask app on your mobile device and enter your account password to unlock the app.
Depending on the device and OS, you may be able to unlock your wallet using any of the available (and configured) biometric methods including Face ID, Fingerprint, or Face Unlock.
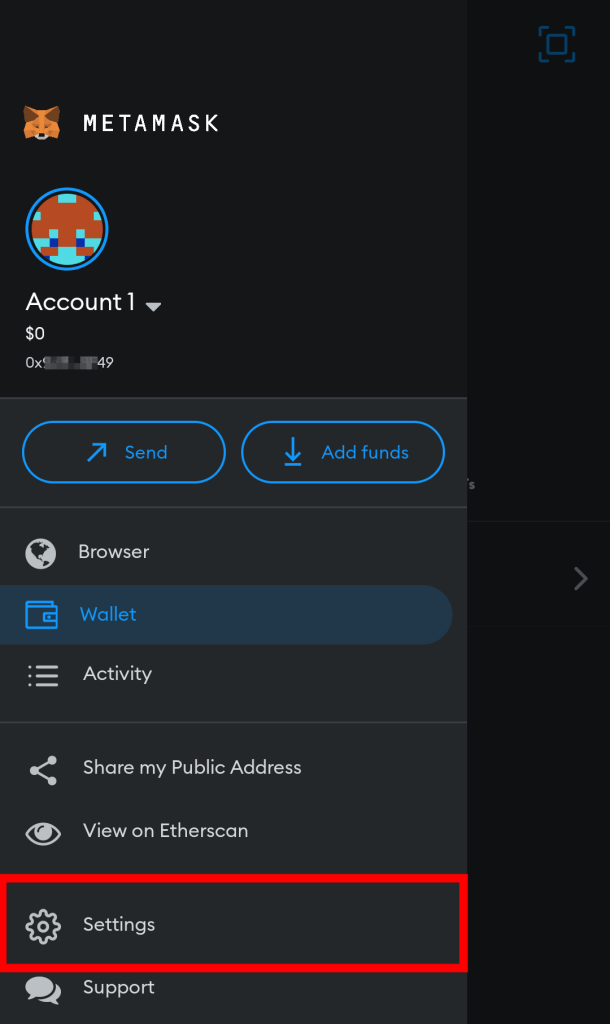
Once the app is unlocked, tap the Menu icon on the top left corner of the Metamask app home screen/dashboard.
Next, select [Settings] from the menu items.
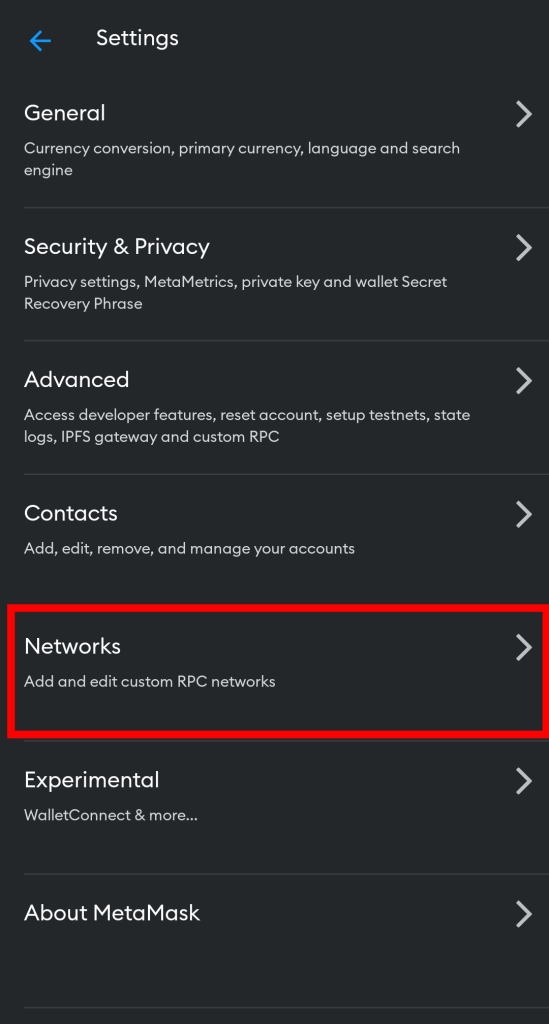
Step 4: Select [Networks] on the Settings page.
On the Metamask app Settings page, select [Networks] to view all available networks on your wallet.
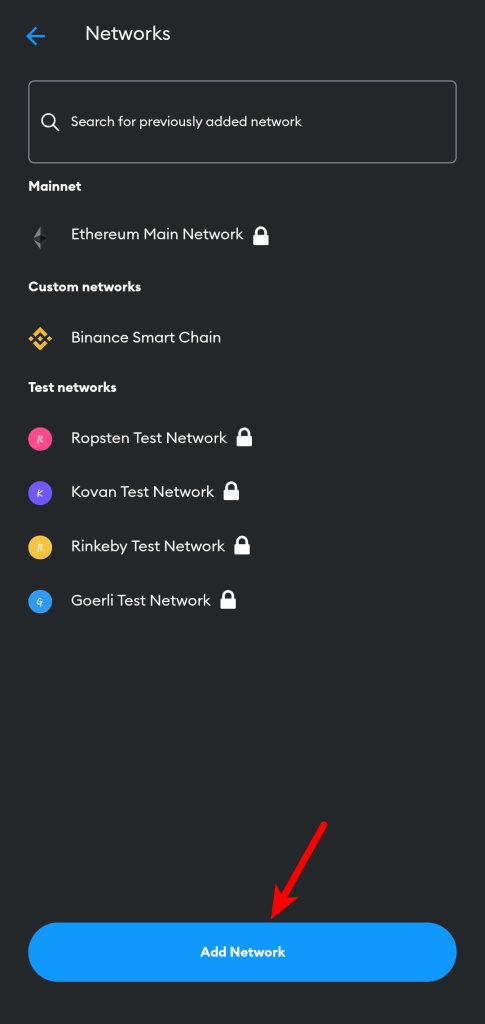
Step 5: Now, tap [Add Network].
Now, tap on [Add Network] to add a new network to your wallet.
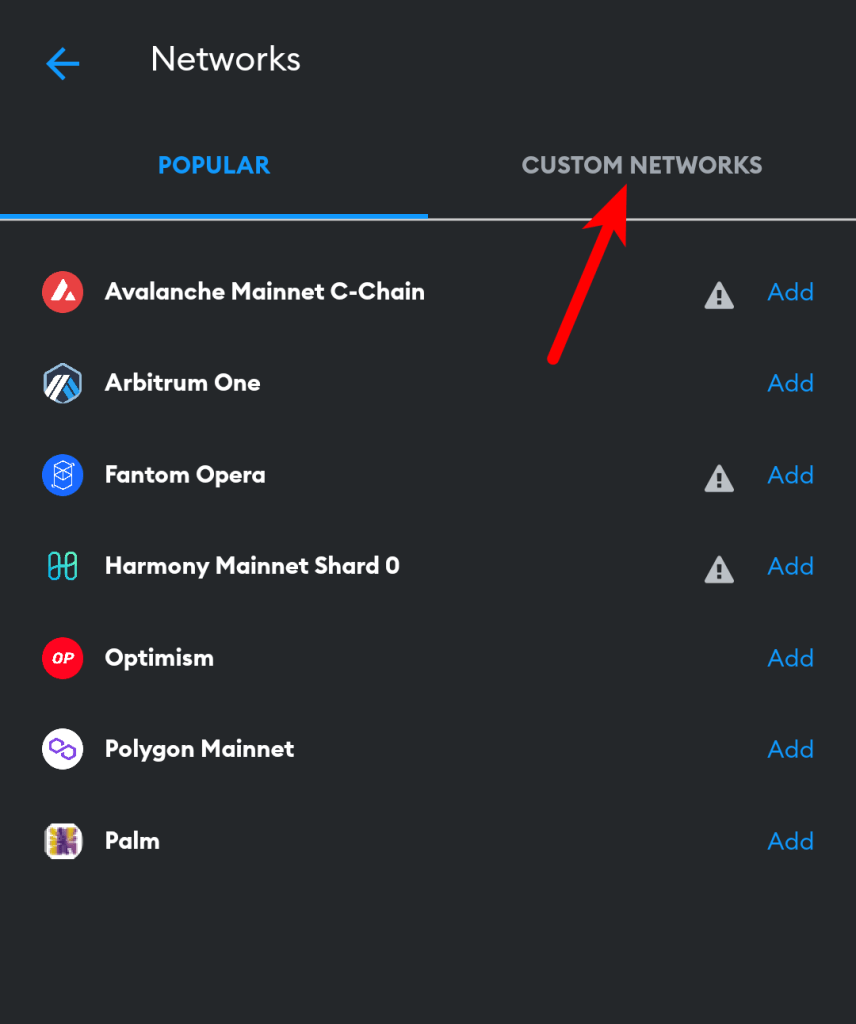
Step 6: Switch to the “Custom Networks” tab.
On the “Networks” page, you should see a list of networks that can be added to Metamask automatically in the “Popular” section.
Since the Evmos network cannot be added automatically on the Metamask app, we’ll have to add it manually so switch to the Custom Networks tab by tapping on “Custom Networks” or simply swipe from the right.
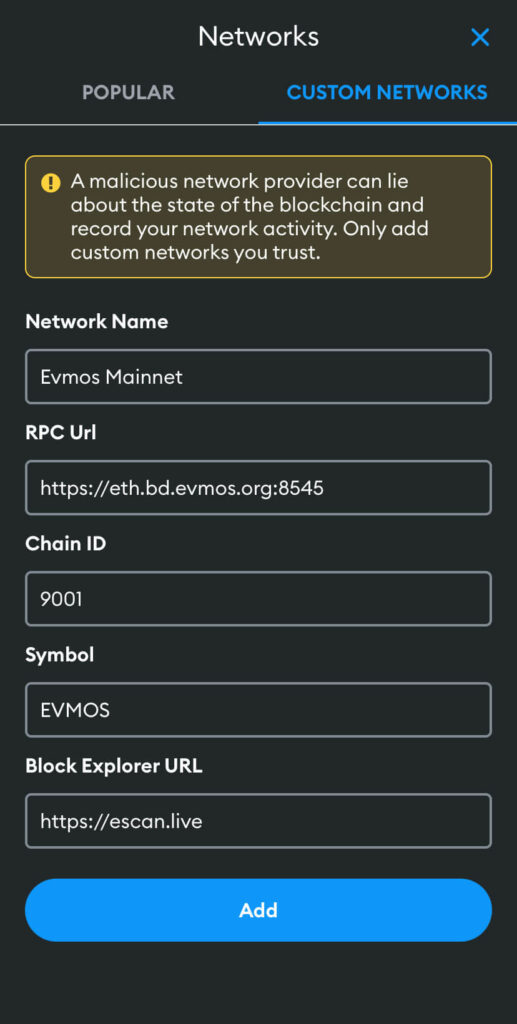
Step 7: Input the RPC details of the Evmos Mainnet and tap [Add].
Next, enter the RPC details for the Evmos Mainnet including the Network Name, RPC URL, Chain ID, Symbol, and more outlined below as seen in the next screenshot.
- Network Name: Evmos Mainnet
- New RPC URL: https://eth.bd.evmos.org:8545
- Chain ID: 9001
- Currency Symbol: EVMOS
- Block Explorer URL: https://escan.live
Once you have filled all the fields correctly with the appropriate details, click on [Add] to add EVMOS to your wallet on the Metamask app.
Wrapping Up
The Evmos network is an EVM-based chain with composability and interoperability to the Ethereum blockchain which was built using the Cosmos SDK.
Since it is an EVM-based network, there are currently 2 methods you can use to add the EVMOS to your Metamask wallet. The first method is by adding the network to your wallet using the correct RPC details of the Evmos Mainnet (or Testnet/Local node depending on the use case).
The other method is using a platform known as ChainList. ChainList allows users to connect their Metamask wallets to available EVM networks automatically.
To add the Evmos network to your Metamask wallet manually, you have to first get the correct RPC details of the Evmos Mainnet which have been outlined in the article. After that, simply click [Add Network] > [Add Network Manually] and input the RPC details in their correct fields.
Alternatively, you can add the network to your wallet automatically using the ChainList To do that head over to the ChainList website and connect your wallet. After connecting your wallet, search for the Evmos Mainnet and add the network to your wallet from the search results.
And that will be it for this guide. If you were searching for a way to connect your Metamask wallet to the Evmos network, we hope this guide helped you achieve that easily.
