SushiSwap is one of the most popular decentralized exchanges on the Ethereum network. This DEX which is based on Uniswap describes itself as a community that was built to solve the problems surrounding liquidity in the DeFi ecosystem.
Netmask on the other hand is the leading self-custodial wallet for Ethereum. The wallet allows users to send, receive, store, store and swap ETH and other ERC-20 tokens on the Ethereum network.
If you are new to SushiSwap, Metamask, and DeFi in general, then this is a good tutorial for you as here, we will be discussing the various ways to use SushiSwap with Metamask.
In this article, you will learn how to connect Metamask to SushiSwap (and also disconnect) as well as how to link the Metamask app with SushiSwap and how to get the SushiSwap token (SUSHI) on your Metamask wallet.
How To Connect Metamask To SushiSwap
- Open the SushiSwap page on your browser.
- Click [Connect Wallet].
- Select Metamask from the list of supported wallets.
- Select an account on the Metamask window.
- Click [Next].
- Finally, hit [Connect].
How To Use SushiSwap With Metamask (Step-By-Step Guide)
SushiSwap works with the Ethereum mainnet, the Binance Smart Chain, Avalanche, Polygon, Fantom, and a handful of other crypto networks. You can swap tokens that are deployed on any of these networks directly on the SushiSwap web page and it supports cross-chain swaps across these networks too.
To use SushiSwap with Metamask, you have to first connect your wallet to the platform.
After connecting your wallet, you will be able to swap tokens on any of the supported networks, provide liquidity for various liquidity pools, stake $SUSHI tokens, and more.
Below is a step-by-step guide showing how you can connect your Metamask wallet to SushiSwap.
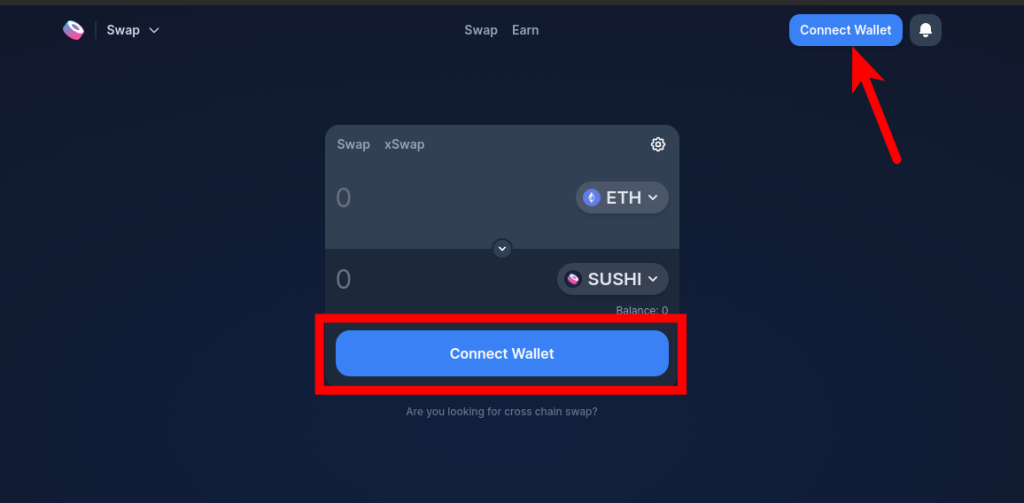
Step 1: Open the SushiSwap page and click [Connect Wallet].
First, open the SushiSwap page [https://www.sushi.com/swap] on a new tab on your web browser. When the page is loaded up, click [Connect Wallet].
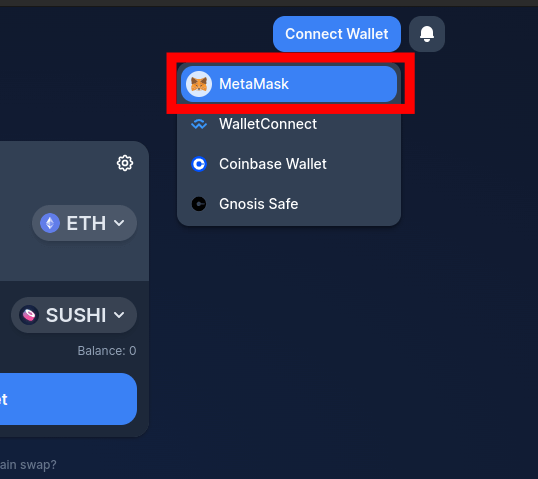
Step 2: Select Metamask from the list of supported wallets.
Now, select Metamask from the list of crypto wallets supported by the SushiSwap exchange.
Step 3: Select the account you want to connect to SushiSwap and click [Next].
You should see a pop-up Metamask window. Select the account you want to connect to SushiSwap here and click [Next].
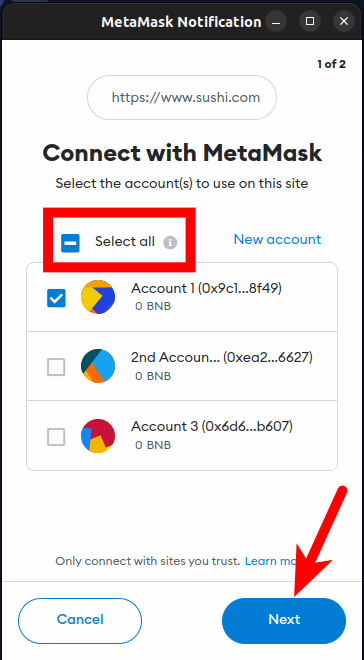
If you want to connect all the accounts on your Metamask wallet to SushiSwap, click [Select All] before clicking [Next]. We generally do not recommend connecting all your accounts to any DApp, just the account you want to use.
Step 4: Approve the connection on Metamask.
Finally, hit [Connect] and your Metamask wallet should be connected to the SushiSwap exchange.
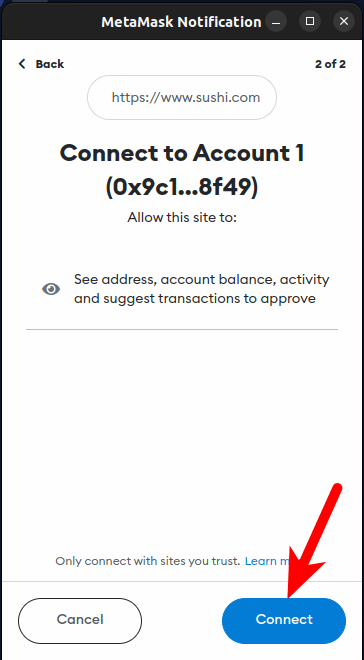
And that’s it. You have successfully connected your Metamask wallet to the SushiSwap exchange.
To swap tokens on SushiSwap, select the token you want to swap from in the top section and the token you want to swap to in the bottom section then enter an amount to be swapped and click [Swap].
After that, click [Confirm Swap] and approve the transaction on your Metamask wallet.
For cross-chain swaps, go to the Sushi xSwap page and select the network to be bridged from and the network you’re bridging to. Now, choose the token you want to bridge from (and to) then enter an amount.
Once that’s done, review the conversion rate, price impact, bridge fee, and estimated processing time then click [Swap] > [Confirm Swap] and approve the transaction on your Metamask wallet.
How To Disconnect Metamask From SushiSwap
When you’re done using the SushiSwap exchange or any decentralized application at all, it is recommended that you disconnect your wallet from the website to ensure your wallet is safe.
Below is how to can disconnect Metamask from SushiSwap.
First, launch Metamask and unlock your wallet. After that, you should see the Metamask dashboard and your ETH balance.
Click on the Menu icon and select [Connected sites] to view a list of websites connected to your Metamask wallet.
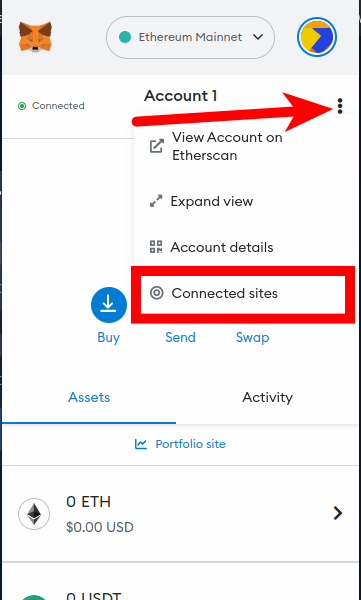
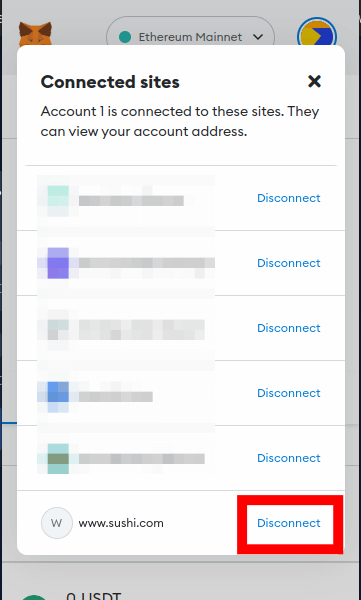
Step 2: Click [Disconnect] next to the Sushi URL to disconnect your wallet.
Next, search for the Sushi website URL (sushi.com) and click [Disconnect] next to the URL on the dialog to disconnect the website from your wallet.
After that, click [Disconnect] on the pop-up dialog box.
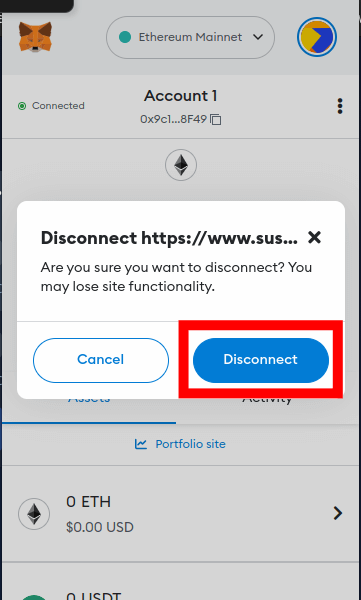
And that’s it. You have successfully disconnected your Metamask wallet from SushiSwap.
How To Connect The Metamask App To SushiSwap
If you access your wallet exclusively via the Metamask mobile app for Android devices and iPhones, the process of connecting your wallet to the SushiSwap website is quite different.
Below is how you can connect the Metamask mobile app to SushiSwap.
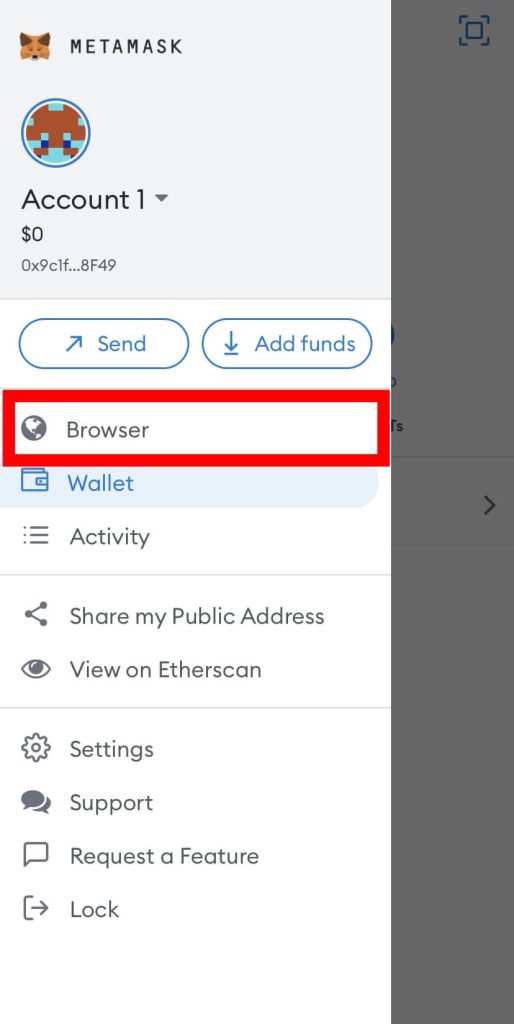
Step 1: Launch the Metamask browser.
Open the Metamask app and tap the Menu icon on the top left corner of the home screen. After that, select [Browser] from the menu options to launch the Metamask in-app browser.
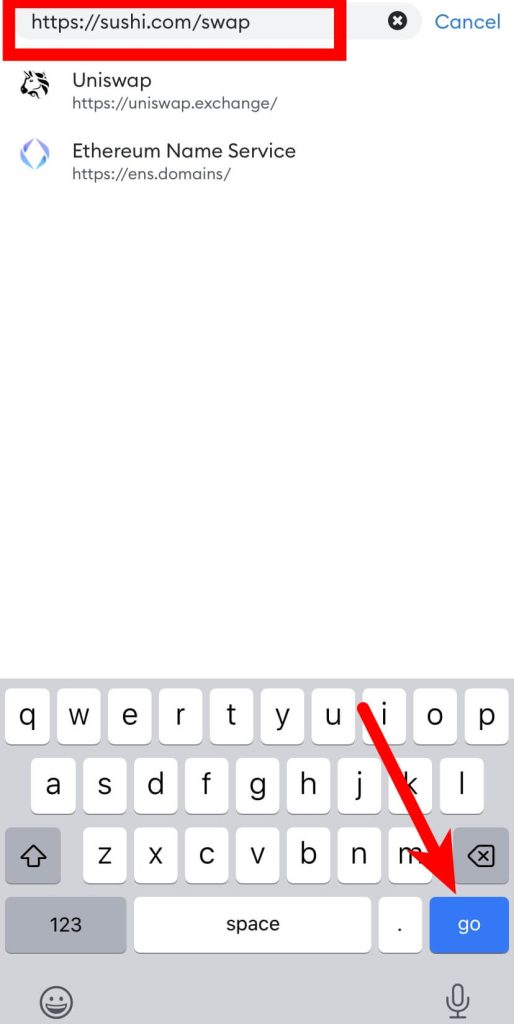
Step 2: Enter the SushiSwap page URL and hit Go.
Next, enter the URL for the SushiSwap page [https://www.sushi.com/swap] in the URL bar and hit go (or Enter) on your keyboard.
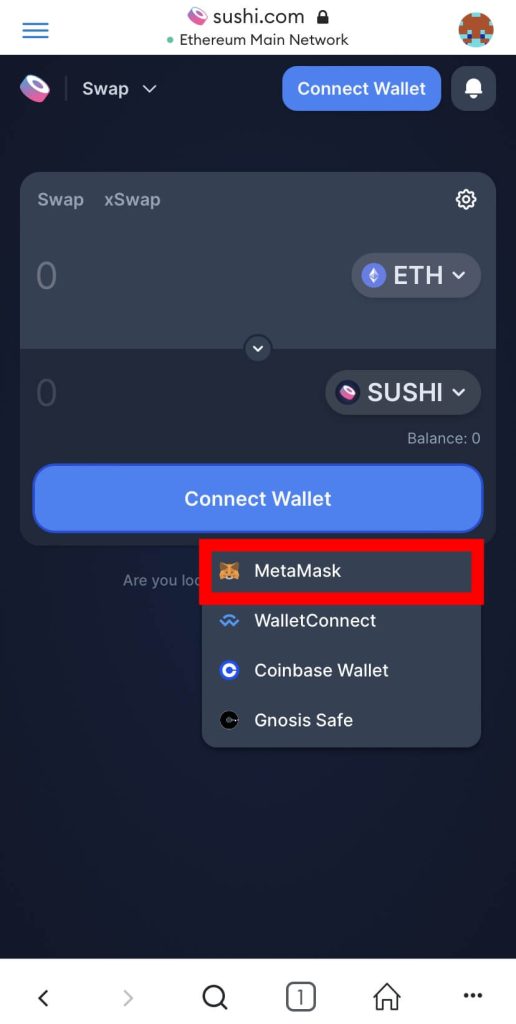
Step 3: Tap [Connect Wallet] and select Metamask.
Once the SushiSwap website is loaded up, tap the [Connect Wallet] button and select Metamask from the list of supported wallets.
Step 4: Approve the connection.
Finally, click [Connect] on the bottom dialog box to approve the connection.
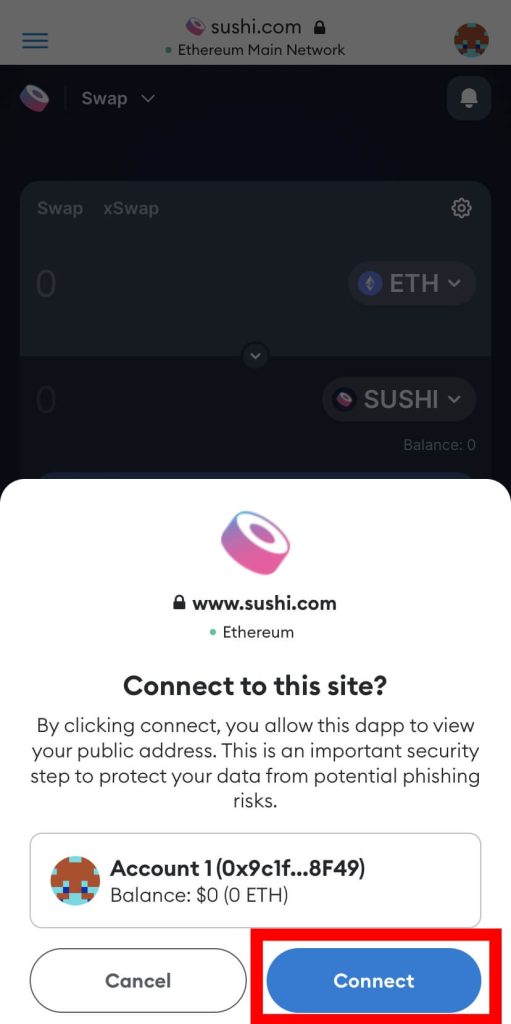
After that, your wallet should be connected to the SushiSwap website and you can swap tokens on a specific network or across different supported networks using the Swap and xSwap features on SushiSwap respectively.
How To Add SUSHI Token To Metamask?
The native currency of the Sushi ecosystem is the $SUSHI token and since the token is an ERC-20 token on the Ethereum blockchain, it can be added to Metamask.
If you want to transfer SUSHI from an external wallet or crypto exchange to your Metamask wallet, you have to first add the token to your Metamask wallet.
Here is how to add the SUSHI token to Metamask.
1) Click [import tokens] on the Metamask home screen.
Launch Metamask and click [import tokens] on the Metamask home screen.
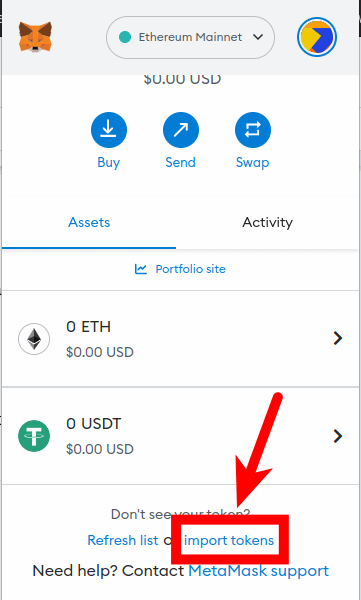
If your wallet is not connected to Ethereum, switch back to the Ethereum mainnet on Metamask.
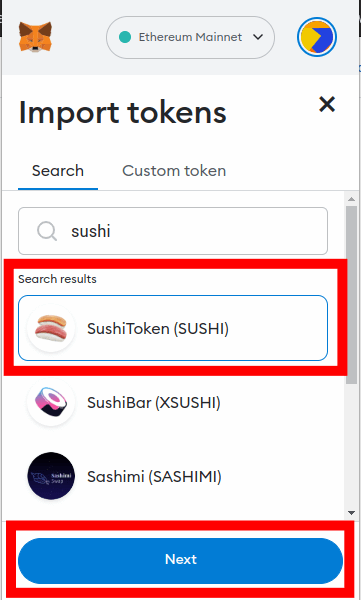
2) Search for the SUSHI token, select the correct option and click [Next].
Next, type in “sushi” in the search box and select the correct option from the search results as illustrated in the screenshot below. After that, click [Next].
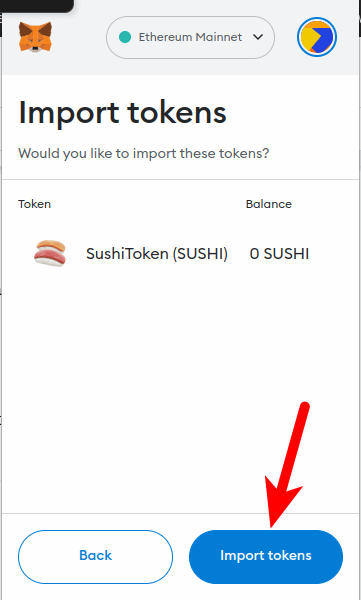
3) Finally, click [Import Tokens].
On the next page, click [Import Tokens] to add SUSHI to your Metamask wallet.
Wrapping Up
SushiSwap is one of the leading decentralized exchanges in the DeFi ecosystem. It supports swapping tokens on the same blockchain and also cross-chain token swaps on a handful of blockchains.
To use SushiSwap, you have to connect your Ethereum wallet to the website. If you use Metamask, connecting your wallet to SushiSwap is quite easy.
All you have to do is open the SushiSwap website on a new tab, click [Connect Wallet], select Metamask from the list of supported wallets and approve the connection on the Metamask window that shows up.
The process is also similar on the Metamask app but this time, you have to use the browser which is built into the Metamask app itself.
And that will be it for this guide. We hope this article showed you how to use SushiSwap with your Metamask wallet and also how you can add the SUSHI token to Metamask using the SUSHI contract address.