

The Gnosis Chain which was formerly known as xDai is an EVM-compatible blockchain that offers faster transaction speeds and low gas fees when compared to the Ethereum mainnet and other popular blockchains aimed at decentralized apps out there.
It is designed to support stable person-to-person transactions, microtransactions, conference currencies, community currencies, DeFi, NFTs, DAOs, games, and more.
Metamask on the other hand is a top cryptocurrency wallet. It is a decentralized non-custodial wallet that allows users to send, store, receive, swap, and trade various coins/tokens across multiple compatible blockchains.
By default, Metamask is only configured to work with the Ethereum Mainnet and Ethereum-based tokens. One of the best features of Metamask is the ability to add other EVM-compatible networks and their associated tokens to your wallet easily.
In this article, you will learn how to add the xDai network (Gnosis Chain) to Metamask in 5 quick steps on both the Metamask extension and mobile app for Android devices and iPhones.
How To Add Gnosis Chain (xDai) To Metamask
- Launch the Metamask extension/mobile app and unlock your account.
- Click on the network selection box.
- Select [Add Network].
- Enter the correct RPC details for the Gnosis Chain and click [Save].
- Transfer some xDai tokens to your Metamask wallet.
How To Add The xDai Network (Gnosis Chain) To Your Metamask Wallet (Guide)
To add the Gnosis Chain (formerly xDai) to your Metamask wallet you first need to copy the correct RPC details of the network which will be included later in this guide. This includes the network name, RPC URL, Symbol, Chain ID, and more.
After copying the RPC details for the Gnosis Mainnet, all you have to do is input each of these in the appropriate fields on the Metamask extension/mobile app then click on [Save] to add the network to your wallet.
Below is a step-by-step guide on how you can add the Gnosis Chain (xDai) to Metamask easily.
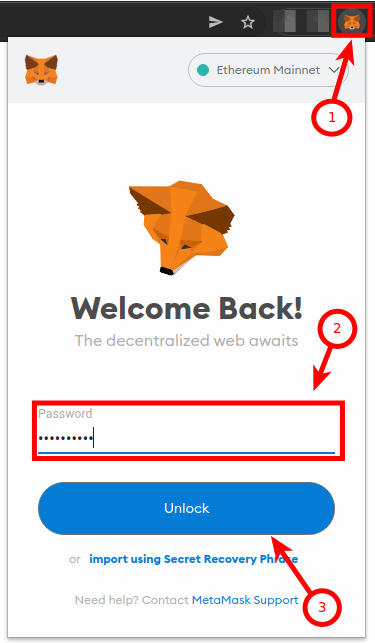
Step 1: Launch Metamask and input your account password to unlock the wallet.
If you haven’t installed the Metamask extension on your browser, you can install the correct version for your web browser on the Metamask download page.
Already installed the extension? You can skip this step since installing again will not be needed.
Once you have the extension installed and correctly set up, click on the Metamask icon in the extensions area of your web browser to launch the Metamask main window.
Enter your account password and click on [Unlock] to unlock your wallet.
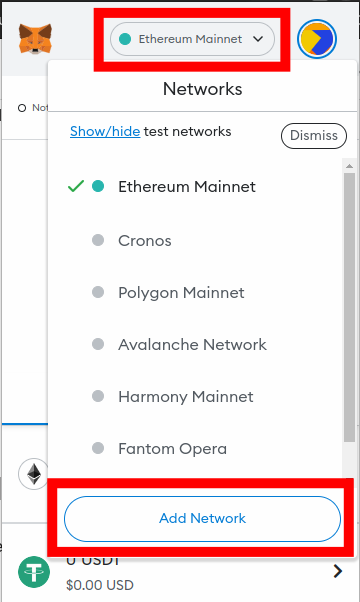
Step 2: Click on the network selector box and select [Add Network].
On the Metamask main window, click on Network Selector Box to reveal a dropdown dialog with all available (configured) networks on your Metamask wallet.
Now, click [Add Network] on the dialog to add a new network (Gnosis) to your Metamask wallet.
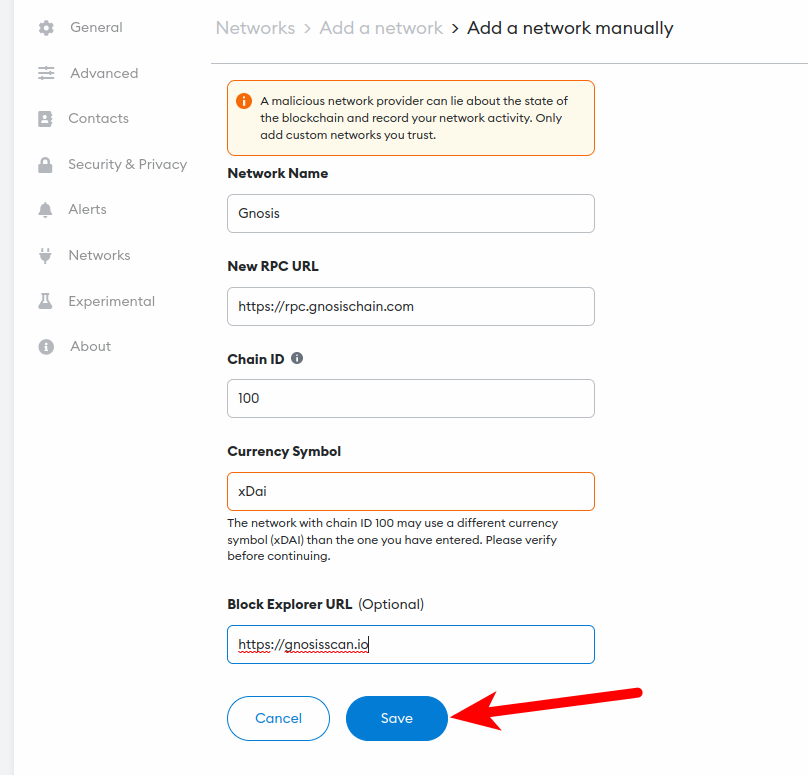
Step 3: Enter the RPC details for the Gnosis Mainnet and click [Save].
On the next page, input the custom RPC for the Gnosis Mainnet outlined below in the appropriate fields as seen in the next screenshot.
- Network Name: Gnosis
- New RPC URL: https://rpc.gnosischain.com
- Chain ID: 100
- Currency Symbol: xDai
- Block Explorer URL: https://gnosisscan.io
Once you have filled all the fields correctly with the appropriate details, click on [Save] to add Gnosis (xDai) to your Metamask wallet.
After this, the Gnosis network should be added and automatically selected as the default network on your Metamask wallet.
If it is not selected, go back to the Metamask main window and click on the network selector box then select “Gnosis” from the list of available networks on the dialog.
How To Add Gnosis (xDai) On The Metamask Mobile App (Android & iPhone)
Adding the Gnosis mainnet to your Metamask wallet via the Metamask mobile app on Android or iOS is similar to the process of doing the same on the Metamask wallet browser extension.
To add Gnosis (xDai) to the Metamask mobile app, your wallet needs to be unlocked first.
After that, copy the correct Gnosis RPC endpoint details which will be provided below, and paste them into the appropriate fields then tap on Save to add the network to your wallet.
Below is how you can add the Gnosis Chain to the Metamask mobile app.
Step 1: Launch the Metamask app and unlock your wallet.
Launch the Metamask app on your mobile device and enter your account password to unlock the app.
Depending on the device and OS, you may be able to unlock your wallet using any of the available biometric methods including FaceID, Fingerprint, or Face Unlock if Biometrics unlock is enabled on the Metamask app.
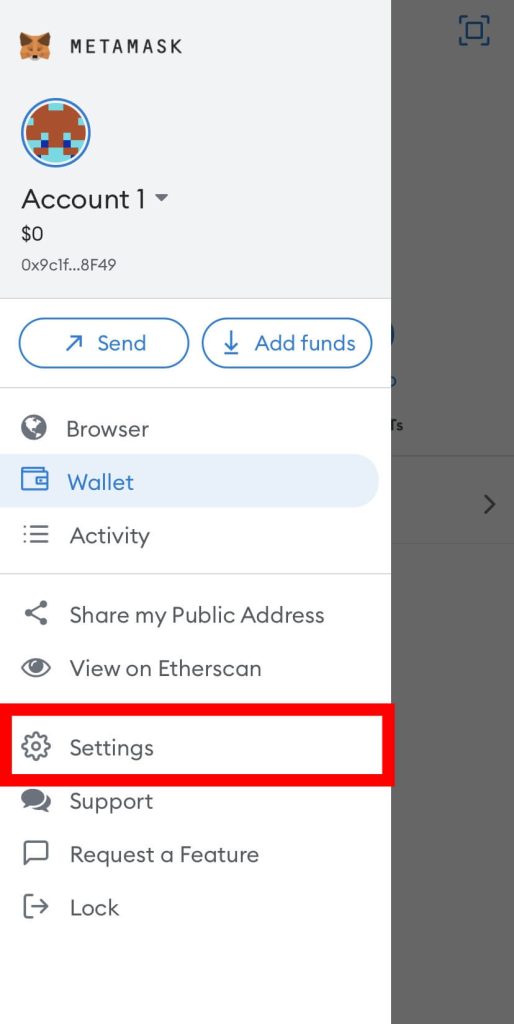
Once your wallet is unlocked, tap on the Menu Icon on the top left corner of the Metamask app home screen/dashboard.
Next, select [Settings] from the menu items.
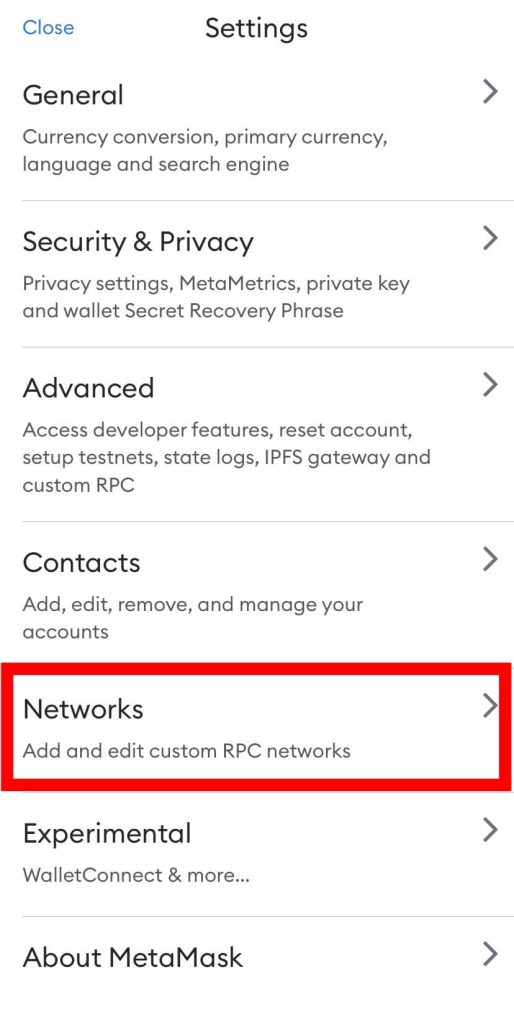
Step 4: Select [Networks] on the Settings page.
On the Metamask app Settings page, select [Networks] to view all available networks on your wallet.
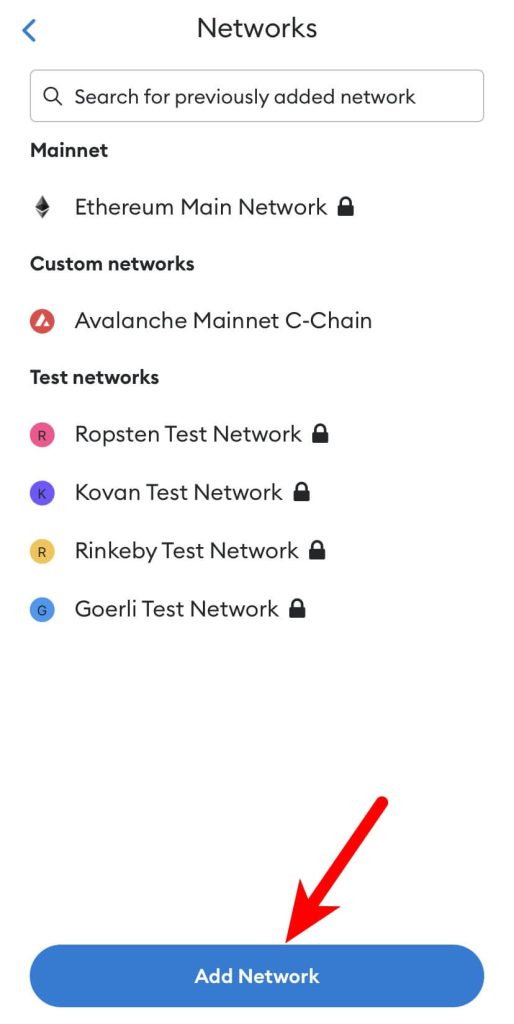
Step 5: Now, tap [Add Network].
Now, tap on [Add Network] to add a new network to your wallet.
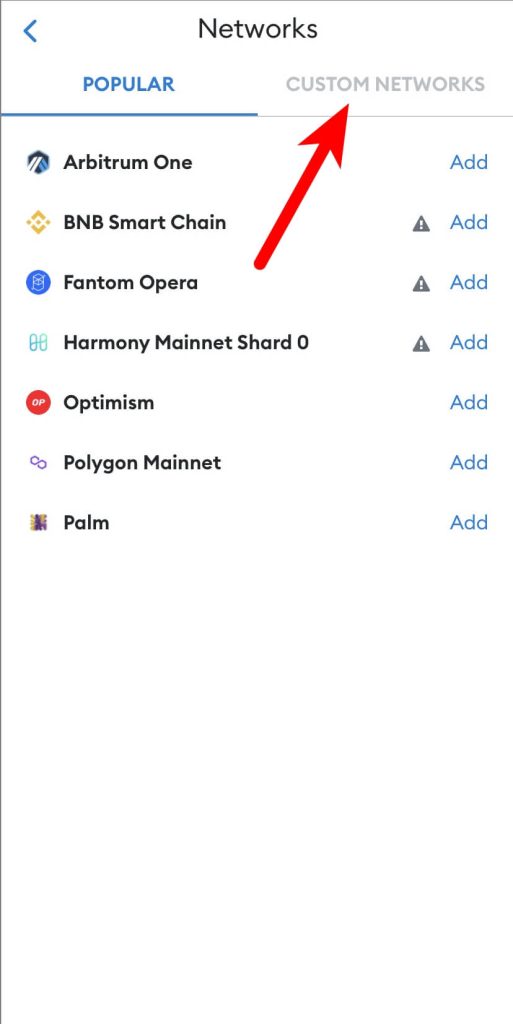
Step 6: Switch to the “Custom Networks” tab.
On the Networks page, there is a list of preconfigured networks which is available in the Popular section.
Since the Gnosis mainnet is not pre-configured on the Metamask app, we’ll have to add it manually so switch to the Custom Networks tab by swiping from the right.
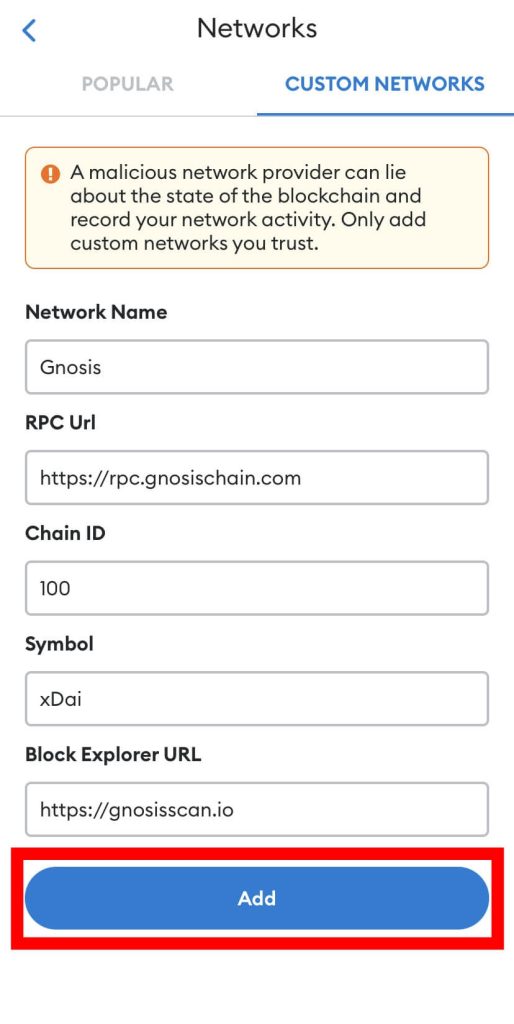
Step 7: Input the custom RPC endpoint details for Gnosis Mainnet and tap [Add].
Now, enter the custom RPC endpoint details for the Gnosis Mainnet including the Network Name, RPC URL, Chain ID, Symbol, and more outlined below as illustrated in the next screenshot.
- Network Name: Gnosis
- New RPC URL: https://rpc.gnosischain.com
- Chain ID: 100
- Currency Symbol: xDai
- Block Explorer URL: https://gnosisscan.io
Once you have filled all the fields correctly with the appropriate details, click on [Add] to add Gnosis (xDai) to your Metamask wallet.
When this is done, Gnosis should be selected as the default network on your wallet and Metamask will attempt to inform you that your default network has been switched via a pop-up dialog. Tap on [Got it] to close the dialog.
With that, you have successfully added the Gnosis chain to your wallet on the Metamask mobile app.
Wrapping Up
Well, that’s it. You have successfully added the Gnosis network (formerly xDai) to your Metamask wallet if you followed this guide up until this point.
Since Gnosis is an EVM-compatible network, it can be added to Metamask just like other blockchains which are compatible with the Ethereum Virtual Machine (EVM).
To add xDai to your Metamask wallet, you first need to get the correct custom RPC endpoint details for the Gnosis Mainnet.
Once you have the RPC details (included earlier in the article), you can then head over to the Metamask extension (or mobile app) and add the network to your wallet using these RPC details including the Network name, RPC URL, Chain ID, Symbol and Block Explorer URL.
If you were looking for a way to add the xDai network to Metamask, we hope you found this guide helpful.
